Thursday, January 10, 2019

Citation II type rating - Day 3 - the sim!

I was wrong - in the Day 1 post I said we wouldn't get into the simulator for another week. But we did a little in it today! More about that in a minute.

Spent some time today on the "paper tiger". I have no idea why it's called that.

pa·per ti·ger
/ˈpāpər ˈtīɡər/
noun
  1. a person or thing that appears threatening but is ineffectual.

It's just a simple mockup of the cockpit in the classroom. One thing that's nice about the training here is that the facility is open 24 hours a day. I could come in at 3 AM and practice if I wanted to!

But today I ran through some checklists sitting in front of this thing:


It definitely helped a lot with figuring out where the various switches and controls are. On the checkride, I don't want to have to hunt for the "Surface De-Ice" switch or the "Windshield Bleed Air" knob. Plus it helped me develop some flows for use with the checklist and some muscle memory.

But the instructor had a surprise for us later in the day. We were supposed to not be in the simulator for another few days, but he found out that it was going to be free at 2:30 and coordinated for us to have it at that time. Great!

The intent for this simulator session was really pretty simple - get us in it, see how it works, practice some with the avionics, and fly a little. Very low stress; it was designed to be a relaxed flight. Since there are three of us in the class, we took turns. But that was valuable as we got to see the others work. Next week there will just be two of us at a time for our sim sessions.

Obligatory "hero" shot...
The sim is based on an older Citation II - all round gauges, no glass in sight. But since that's pretty much what I fly with every day, it felt like home.


The visuals themselves are perfectly fine, especially since I generally won't have anything to look at anyway (inside of clouds), though the projection system itself is a bit wonky. You have to hold your head just right to get the best view, otherwise there are misalignments and large black areas. But that may just be because it's an older simulator.


Even though it was just the first day, after a simple trip around the pattern the instructor decided to spice it up a little and threw some engine failures at us - I got one below V1 and one above V1 (V1 is the speed at which below that, you will abort on the runway. Above that, you will continue the takeoff and deal with the problem in the air).

So, a fun day and a good intro to the sim. Now I think I'm correct when I say it will be another 5 days until I get back in it for the real work.

Wednesday, January 9, 2019

Citation II type rating - Day 2

After finishing my homework last night and getting mostly good sleep, it was on to day 2. Finally today we got into the engines! Sure, yesterday's discussion about electrical systems, emergency equipment and how the flight manual is arranged was necessary, but jet engines have always fascinated me and I was excited to get to this part of the syllabus.


I can tell you now that each engine has 12 fuel nozzles, 1 exciter and 2 igniters. It makes 2500 pounds of thrust at sea level. It has a centrifugal compressor. Maximum turbine temperature is 700 degrees Celsius for 5 minutes, 680 continuous. Max N1 speed is 104%, N2 is 96%. I have these numbers and more all crammed in my brain right now. Hopefully they will stay there for at least another 12 days!

Now, while I haven't flown them, jet engines I've worked with and around before. But other topics today, like the fire protection system were completely new to me. Not many fire protection systems on a Cherokee! Similar for the pressurization system and lots of talk about bleed air - where it comes from, where it goes to, and what it's for. And, naturally, anti-ice systems.

Typical training slide from today:


This is a lot to learn! But it's interesting and I think I'll keep going...

Tuesday, January 8, 2019

Citation II type rating - Day 1

Today I arrived at CAE Simuflite for their 2-week Citation II type rating course!


This is my first type rating. I have extremely limited turbine time, consisting of just two "right seat" flights, one in a CJ1+ and one in a Citation II. So I really have very little similar experience to go off of.

It should be interesting!

I have leads on some contract pilot work flying Citation II's in the OKC area, so it seemed like now was a perfect time to take that next step. Additionally, I have some remaining GI Bill benefits that will cover much (but not all) of the cost. So with that in mind, why wait?

Mine is a very small class - 3 people total, one of whom is doing the SIC course and will not be with us for all the simulator sessions. So it was pretty easy to figure out who my sim partner would be. The instructor is an active Citation II pilot when he's not teaching, so he will hopefully be able to share a lot of good information.

Today's ground school worked through some of the aircraft systems - landing gear, hydraulics, electrical, etc. It was pretty dry stuff.

Fortunately a friend had gone through the course back in June, and loaned me all his training materials. So I've been studying for a month now and feel pretty ready, although like with most things, I don't really know what I need to know. Though I'm sure the homework (yes, homework!) will help.

But I'm ready for more - bring it on!

Won't see the inside of this for another week - got to finish ground school first!


Tuesday, May 15, 2018

Goodbye /DME, Hello Equipment Requirements Notes!

(This article is a companion post to episode 178 of the Stuck Mic AvCast)

Big news on the instrument approach charting front! In the near future you will not be seeing any more VOR/DME or LOC/DME or anything /DME procedures in the U.S. In fact, it's already started, but beginning with the 5/24/18 chart cycle, even more changes will take place. These changes could all be grouped under the heading "Equipment Requirements Notes".

Let's take it one thing at a time.

/DME


For as long as I can remember, if you had a VOR/DME or LOC/DME procedure, the /DME in the name signified that you needed to have a DME receiver in order to identify the Final Approach Fix, as in this example.  We may or may not need it elsewhere, but we knew we needed it to identify the FAF, in this case, NUCIK, CNU 12.9 DME.


FAA Order 8260.19H no longer provides for the "/DME" (or /anything else) in the procedure name, so these are being gradually removed. This means that the example VOR/DME RWY 17 above will eventually be simply the VOR RWY 17. But how will we know it requires DME, if it's not in the name? Simply, this removal of /DME from the name is part of a larger move to consolidate all the various equipment requirements notes into one location on the chart, as I'll discuss below.

Other equipment notes


We are also used to notes showing up in either the notes box or in the plan view.


Sometimes this would lead to confusing situations, like this:


Wait, do I need to have ATC radar coverage, or DME, or both?

These notes have always been a bit confusing, as the positioning of the notes affected its meaning. A note such as "DME Required" in the notes box meant that DME was required on the missed approach. If that same note was positioned in the planview, however, it meant that it applied to procedure entry from an IAF. From the AIM 5-4-5a3(b):


This placement criteria is more than a little confusing, however, so the best rule is to always review each approach to determine how you will identify each fix, starting at the appropriate IAF. We're getting out of practice on that with the prevalence of GPS substitution, so it's extra important to take some time to chair-fly the approach when we don't have an IFR GPS on board.

However, that is all changing (gradually).


Equipment Requirements Notes


The FAA Order 8260.19H, which is the FAA document guiding the documentation of procedures, adds a new box to the approach charts - the "Equipment Requirements Notes" box. This box, located near the top of the chart, will spell out what additional equipment is required to the fly the approach, but more importantly, where that additional equipment is needed.

Some examples from the 19H are:

"DME required for procedure entry"

"DME required for LOC only"

"DME or RADAR required to define GIGGS"

Procedures with this new box are showing up starting in the 5/24/18 publication cycle. However, like any change of this nature, it will take years for the updates to make it through all the approach charts in the U.S. inventory.

Here are some actual examples of 5/24/18 charts with those new notes.

First, a VOR/DME that is now going to be a VOR approach with DME required:

Old:


New:


More examples:


On this one, there is no valid fix makeup for DACCA (no DME source, and the angle for the FKL VOR radial would be too obtuse), so RADAR is required. Once you get past DACCA, though, no special equipment or RADAR is required.


Here you need either an ADF to fly the procedure turn based on the VEELS LOM, or a DME receiver to fly the arcs. Once you're established on that 131 course, though, normal ILS, VOR and marker beacon receivers can get you all the way to the missed approach holding fix:


Of course, if you have an IFR-certified GPS receiver, you can usually use it to substitute for these equipment requirements (following the appropriate AIM and AC 90-108 guidance). But putting "or GPS" in every single one of these notes would be a bit redundant...


PBN Equipment Notes


So far I've discussed only conventional, non-RNAV approaches. But don't worry, RNAV approaches get similar changes as well, there just aren't as many different possibilities. However, the changes introduce some terms that will be new to many people.

Very simply, there is a broad concept called "Performance-Based Navigation", or "PBN". PBN systems not only have an accuracy requirement, but among other things also have an alerting requirement for when it calculates it's not able to provide that accuracy. 

Think about a VOR - it has an accuracy requirement (30-day VOR checks), but if the accuracy right at the moment you're using it is degraded for any reason (signal problems, internal equipment errors, who knows), it has no way of determining it and telling you. A "NAV" flag on the VOR will indicate that the VOR transmitter itself is not working, but there's no way for the unit to check itself or the accuracy of the transmitter.

A PBN system, however, has to be able to tell you if the accuracy is degraded. The most popular type of PBN system in GA is, of course, an IFR-approved GPS receiver. But there are other systems - DME/DME/IRU being one of them. The new PBN requirements introduce levels of performance specifications that the aircraft equipment must meet to fly various procedures.

Different types of procedures require different levels of performance. The Required Navigation Performance specification is abbreviated "RNP". Rather than go into too much more discussion here, the AIM paragraph 1-2-2 has the details.

While PBN and RNP concepts can be very confusing, allow me to simplify - most light GA aircraft with a IFR-approach approved GPS receiver meet the "RNP APCH" NavSpec.

The term RNP has actually been around longer than we realize. We're all familiar with the DME/DME RNP-0.3 NA note, it has been on every RNAV (GPS) approach chart for a long time:


Most of us have been glossing over it during an approach briefing because it doesn't mean anything to the majority of light-airplane GA pilots whose airplanes have never had a DME/DME RNAV system. This note is going away. 

What will be replacing it is a note saying "RNP APCH":


This makes effectively no difference to the vast majority of GA pilots because as mentioned above, most popular IFR GPS installations in light GA aircraft meet the requirements for "RNP APCH". But seeing it on the chart could confuse some to think it's talking about RNAV (RNP) approaches, which are still only for airplanes that have a higher level of equipment and for aircrews that have received special training.

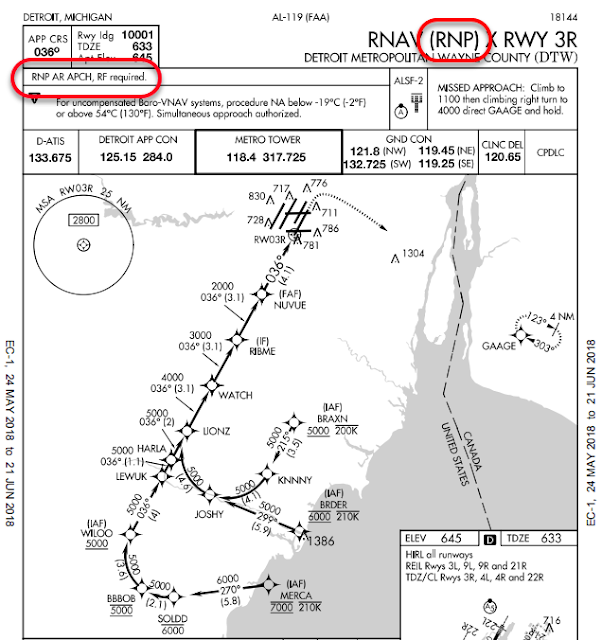
These will still be named RNAV (RNP) in the title, but will have the equipment note "RNP AR APCH" (AR for Authorization Required), as in the example below. (Note that this example has the additional requirement that the equipment has to be capable of flying Radius-to-Fix legs (RF required), since all routes into the procedure require such a leg type.) 


Conclusion

Hopefully, these new notes and placement will make the charts a bit easier to understand, although there is always a learning curve with anything like this.

Garmin has published a list of their equipment and RNP levels each one meets:
(Near the bottom, titled Garmin Flight Plan Information Excel file)

I could not find such a document from the other GA IFR GPS manufacturers, but will link to it if someone can point it out to me.

All of the above chart samples were obtained at the FAA's website, where you can download the actual charts 19 days before each pub day. Also, you can get advanced notice and draft versions of upcoming approaches, obstacle departures, SIDs and STARs from their IFP Information Gateway.

Actual charts obtained from: 

IFP Information Gateway: 

Friday, February 10, 2017

I can't get my holding pattern timing to work!

As I was preparing for a lesson with an instrument student on holding patterns the other day, I got to thinking - why does the timing seldom seem to work out with several recent students? How bad could my teaching be?

As a refresher, for most non-RNAV holding patterns, you want the inbound leg to be 1 minute long.


To make it 1 minute, you adjust the outbound leg timing to be more or less than a minute depending on the wind. You know, you see it in all the training references, and they give examples like "if your inbound time is 50 seconds, then make your outbound leg 1 minute and 10 seconds" or similar examples where the time difference is reasonably small.

And it usually works out that way.

But I distinctly remember noticing with my last instrument student that it didn't seem to work out very well, and I couldn't explain why! He'd time the inbound leg, adjust the outbound leg, and still be quite off. It wasn't his airspeed control, that was just fine.

So I started digging into it and ran a few mathematical simulations, because that's the kind of thing I do.

Turns out, the "add or subtract the difference in time" only really works in light wind. Now, none of us expect that in 50 kt gale force wind any of this would work, but what I found is that the simple method really starts to break down at some fairly routine wind speeds, at least my part of the country (Oklahoma).

Remember turns around a point from Private Pilot training, and how you keep correcting for the wind to maintain that constant radius from the point? If there was no wind, you would maintain a constant bank angle and end up right where you started. Your ground track would draw a perfect circle.

However, what would happen if you had a headwind and maintained a constant bank angle? Your ground track would look roughly like this, the only thing that would change is the amount of elongation depending on the wind speed.


Can we calculate the distance between the beginning of the turn and the end of the turn? Of course we can, and it's especially easy when we're talking about instrument flight and using a standard rate turn of 3 degrees per second, or a "2-minute turn". Since the 360 degrees of turn will take two minutes, the downwind displacement in that amount of time is simply the distance that the wind will move in that amount of time.


For example, if the wind is 10 knots, then the distance between start and end points is 0.33 nm.

At the midpoint of the turn we are half that distance "downwind" from the start point.

Of course, in Private Pilot training we adjust our bank angle to keep that ground track looking like a nice circle. But we don't have that luxury in instrument flying (there being no ground references), so the same principles greatly affect our holding patterns.

And that's what was causing my student's (and my) confusion.

Here in Oklahoma, as with much of the central U.S., most of our holding is done somewhere around 3000 MSL (as in the example above). As I write this, the winds aloft at 3000 at 230 at 45 knots! Now, it is certainly a windy day today, but it is very commonplace here for the wind at 3000 to be about 20-30 knots. And this makes getting quality practice on holding patterns very tricky.

Let's assume a not-unusual wind from the north at 30 knots and a holding speed of 90 knots, also typical for airplanes used in instrument training, like a Cessna 172 or many of the Piper PA-28s. Our mind's conception of a holding pattern looks basically like this:

Yes, this is actually TO SCALE! That might be a first for this blog.
That's great for no wind. We know any wind is going to distort it some. But how much?

With a 30-knot headwind, our outbound turn adopts a shape more like this (in red):

Keeping the nominal holding pattern on there for reference. Everything is approximately to scale.

The end of the outbound turn is clearly quite some distance down the outbound leg - since this turn took 1 minute (standard rate) and the wind speed was 30 knots, that means the rollout point is 0.5 nm past the abeam point. Also, since we start timing the outbound leg when we are abeam the holding fix, this rollout point is somewhere about 17 seconds into the nominal 1-minute outbound leg (the wind is on our tail for this portion of the maneuver, and it's almost a complete tailwind, meaning our average ground speed is close to but not quite 120 knots which would cover the 0.5 nm in 15 seconds).

So we fly outbound for 43 more seconds (at a ground speed of 120 knots), traveling another 1.4 nm downwind, and begin our turn back to the inbound course. Of course, now we're turning into a headwind, so our ground track is a mirror image of what it was before, and our ground speed is slowing. We now have to claw back about 2.4 nm at a ground speed of only 60 knots, which will take about 2 min and 24 seconds!


Huh. Well, we want to get a nice 1 minute inbound leg, so we have to take some time off the outbound leg. But, the normal guidance is you subtract the amount of time from the outbound leg that you were over on the inbound leg - which in this case, is 2:24 - 1:00 = 1:24. Subtract 1:24 from our 1:00 outbound leg? That's a problem. My stopwatch doesn't work on "negative time".

About the best we can do is never stop turning - literally, make a aerial "circle" once we cross the fix the first time. What happens when we do this?

Our ground track looks exactly like the first image in this article!

It turns out that we now are left with the "perfect" case, where we roll out on the inbound course 1 nm from the fix, which at 60 knots ground speed will take right at 1 minute.

So, somewhere between a light breeze and 30 knots of wind, the rule-of-thumb for adjusting timing fails us. That's why it's a "rule of thumb" of course - an attempt to perform easy calculations that work most of the time. Unfortunately, as I have found, it's pretty far off at just 20 knots of wind as well, which is a normal day here in the plains states.

Interestingly, I was recently up with an instrument student on a day when the wind aloft was 40 knots. Pretty smooth actually, but a lot of wind. He was in the holding portion of the syllabus but I knew we weren't going to get much useful practice in that wind. However, for an even worse example of the situation discussed above, we flew a holding pattern directly into the wind. I had him do as stated above and just keep a standard rate turn going through all 360 degrees after hitting the fix. Sure enough, we rolled out on the inbound course and it took about 1:30 to get back to the fix!

It seems that once the wind speed at your holding altitude gets to 1/3 of your holding true airspeed, you would need to do the continuous turn. Any wind speed greater than that will cause you to not be able to obtain a 1-minute inbound leg using standard holding methods.

But the headwind is actually the easier case! At least you have time to adjust and get established on the inbound course.

What about a tailwind?

About this time you probably regret starting instrument training...

This is about what it looks like if you time a 1-minute outbound leg.

15 second inbound leg, that's not much time to get established on the course! That's basically entirely within the "cone of confusion" at these speeds.

For this one, I'll skip ahead to the answer.

To make a 1-minute inbound leg using this tailwind, we will need to head outbound for 2:30 before turning in. That's a lot longer than the rule-of-thumb would give you!

Disclaimer

Yes, I know. We fly real airplanes in real conditions and nothing works out perfectly like the math says - there are a million additional variables involved. But I did find it interesting to see how some of these scenarios would work even if everything was "ideal". And finding out that the headwind scenario doesn't work at all when the wind is greater than 1/3 of your TAS was pretty interesting!

What if the wind was a crosswind?

I think that will have to wait for another day!

Sunday, May 15, 2016

Dead Reckoning legs on Instrument Approach Procedures

I was looking for some unusual approach types to discuss with my current instrument student and came across the "dead reckoning" situation. You don't see this a whole lot, but if you face it while flying it could definitely be a little confusing.

What I'm talking about is an example like this, the Springfield, IL (KSPI) VOR/DME RWY 31:


Look at that leg starting at LATHA. It has the text "3100 NoPT to PUWGO 246 (7.9) and 296 (4.5)". It doesn't show a radial to fly off of LATHA, it just gives a heading. So what gives?

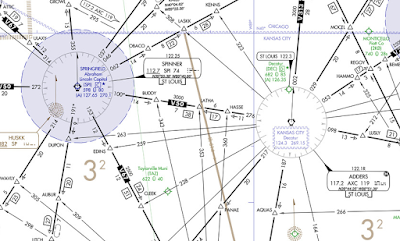
Instrument approach charts don't exist in a vacuum. Often to understand them, we must also refer to the appropriate enroute chart:


Notice that LATHA is sitting on V50 between AXC and SPI VORs, on the AXC R-276. To fly this approach, however, you are expected to fly heading 246 degrees from LATHA. This takes you OFF of the radial, and in fact you have no course guidance at all for this leg!

That's why it's called a "dead reckoning" leg. It's just a heading to fly. In this case, you will fly the heading 246 from LATHA until intercepting the SPI R-296 inbound on the approach. This should take about 7.9 nm according to the charted distance. Then you will fly another 4.5 nm on that R-296 until reaching PUWGO. The distances are approximate, of course, as wind drift will affect your actual track, but are there to give some idea of how long it should take for the intercept.

Notice there is a fix called (CFBVH) - with parentheses - at the intersection of the heading and the final approach course. This is known as a Computer Navigation Fix and is there solely for reference by GPS receivers and FMSes, helping them to align you on the proper course.

Now, you can imagine that with a 7.9 nm leg that has no course guidance, you could be pretty far off course if you have a strong crosswind - and you'd be right. Fortunately that is accounted for in the procedure design and the protected areas are HUGE, and get larger the farther away you get from the starting point.

You tend to find these more often on ILS procedures, as the localizer signal doesn't always point in a convenient direction. Two more examples are at Champaign-Urbana, IL (CMI) ILS or LOC RWY 32R (see the leg from NEWMY),


and the Salina, KS (KSLN) ILS or LOC RWY 35 (legs from both ANTON and GUTER).


There are many more examples, of course, but with ATC radar vectors, we fortunately don't have to fly them very often. Do you have any favorites? Let me know!

Tuesday, March 1, 2016

Procedure turns - when can you descend?

This blog is a tie-in with the Stuck Mic AvCast episode 115, available here!

On the podcast we talked about the procedure turn (PT) and hold-in-lieu-of-procedure-turn (HILPT), and specifically, WHEN can you descend when executing the maneuver?

This type of question comes up often in instrument rating checkrides, job interviews, and of course in real flying and it's important to know the proper point to begin your descent in all phases of flight. So let's get right to specifics!

The first procedure discussed was the Pocatello, Idaho VOR RWY 3:


This procedure has a fairly standard layout, with one exception which we will get to in a bit. But first, some definitions!


Let's say we are starting from somewhere east of the field, cleared direct to the PIH VOR, maintain 8000, and cleared for the approach. When can we descend? There is a "7200" minimum altitude depicted on the left of the profile view, so at some point we know we can descend to that altitude - but where to start?

From the FAA's Instrument Procedures Handbook, Chapter 4:

"The altitude prescribed for the procedure turn is a minimum altitude until the aircraft is established on the inbound course."

Also,

"Descent to the PT completion altitude from the PT fix altitude (when one has been published or assigned by ATC) must not begin until crossing over the PT fix or abeam and proceeding outbound."

The result of this is that we remain at 8000 (since that's what was assigned by ATC) until crossing the PIH VOR/DME. As we turn to that outbound course of 235, we can then begin descending to our procedure turn completion altitude of 7200. We do not have to wait until we're turned around inbound - in fact on some procedures, depending on the amount of altitude we need to lose, that might cause problems in itself! The descent gradients established within a procedure turn are based on the expectation that we will begin descending when crossing the PT fix - the longer we wait, the steeper and steeper we will have to descend to make the FAF altitude (or MDA if there is no FAF).

Once we are turned around and established on the inbound course, THEN we can continue our descent to the FAF altitude - 5600 in this case. From there on in, the procedure is flown like any other.

I skipped over something for a bit - that "PT Fix altitude" of 7800 in this case. Not all procedures with a PT have these. This is an established minimum altitude we must maintain until crossing the fix outbound. In our example, ATC cleared us to the fix at 8000 - so we're above the PT Fix Altitude and there is no problem. But maybe we're flying along an airway, say V21 southwest-bound:


Note the MEA along V21 is only 7000. If we don't plan ahead and are flying right at the MEA, we may find ourselves having to CLIMB to 7800 to meet the PT Fix Altitude! If there is no PT Fix Altitude (as is usually the case), then the PT Completion Altitude is the minimum for entry as well (of course - you wouldn't climb in a PT).

The method of indicating the PT Fix Altitude above is the current charting standard. However, you will still see approaches that have the altitude shown as in this example from Livingston, MT (LVM):


The next example we discussed on the show was the Twin Falls, ID (TWF) ILS OR LOC RWY 26:


This procedure incorporates a holding pattern in lieu of a procedure turn, often called a hold-in-lieu or a HILPT. Just like a procedure turn, the holding pattern is established as a means of turning ourselves around. The only expectation is that we perform the holding pattern entry (using any method, such as the three "standard" holding pattern entries). Then, when we are established on the inbound course we continue on with the procedure. ATC does NOT expect us to perform multiple circuits of the holding pattern, and if we need to do so (in order to get established or maybe to lose altitude) we are required to inform ATC prior to doing so. Again, from the Instrument Procedures Handbook, chapter 4:

"If pilots elect to make additional circuits to lose excessive altitude or to become better established on course, it is their responsibility to so advise ATC upon receipt of their approach clearance."

This procedure has a slight bit of an unusual twist, in that once we are established on the inbound course of 258, we can descend an extra 100 feet, down to 5900 for glideslope intercept.

The last procedure we discussed on the show was the Asheville, NC (AVL) ILS OR LOC RWY 35:


Here's the question - if we are inbound from the SUG VORTAC on the established feeder, where can we descend and to what altitude? The answer is that if we are cleared for the approach from over the SUG VORTAC, we can descend to 6200 while flying that feeder route to the BRA NDB. Once crossing the NDB (which is the HILPT Fix) we can further descend to 5200 while outbound on the holding pattern entry (which, using one of the three standard entries would be a parallel entry). We would stay at 5200 as we turned inbound and all the way back to the NDB. Once crossing the NDB we would begin our descent to 4000 for glideslope intercept.

Those were the three procedures we talked about on the show, but there are a couple more examples of unusual situations that I want to mention.

Some PTs even have a MAXIMUM altitude established at the PT Fix, like Twin Falls, ID (TWF) again, this time the VOR RWY 26:


Notice that we must cross the TWF VORTAC to begin our PT at no higher than 10,000! Maximum altitudes are rarely used on procedures but here one is. Often they are at the request of ATC, but when it comes to PTs they can also be used to limit the size of the evaluated area. For a given Indicated Airspeed, True Airspeed increases with altitude, and therefore turn radius does as well, so PTs above 10,000 have a larger area for obstacle evaluation than those at lower altitudes.

This procedure also has a stepdown fix along the inbound course at 3 DME (XULXU). Just like with any stepdown fix in final, if you can't identify it you have to use the higher set of minimums. In this case, if you find that once you get established inbound you're already inside 3 DME, then you can begin further descent right away. 

One last example, the Kremmling, CO (20V) VOR/DME-A (notice how all of the fun examples are in mountainous states?):


This one actually has a 15NM PT distance limitation, to give pilots more distance to deal with the high altitudes and descents involved. There are some 16,000 and 17,000 foot MEAs on nearby airways, so descent planning becomes a very real consideration!

Notice the PT Completion Altitude of 13,000 is also the first stepdown fix altitude at HADLA, 10 DME. Further descent is allowed to 11,800 at 4 DME, then crossing the VOR is the FAF at 10600. When is the best time to figure this all out? Obviously on the ground during flight planning!

I think that's enough about PTs for now. Thanks for reading (and listening to the show), and let me know if you have any comments or questions!