Monday, January 25, 2016

2015 Cirrus SR22T Review

I know it has been a long time between blogs recently. Been busy flying!

I saw an advertisement in the NAFI Mentor magazine for CFIs to take demonstration flights in Cirrus aircraft. Obviously this is intended to introduce CFIs to the capabilities of Cirrus aircraft so that we can make informed recommendations to clients. I figured, why not?

Well, a few days ago I had the pleasure of taking a beautiful 2015 Cirrus SR22T GTS Xi up on a demo flight with Jeff Sandusky, Regional Sales Director for Cirrus Aircraft. Based at Wiley Post Airport in Oklahoma City, this is a special airplane. Not only because it is the top of the line Cirrus model, it is also the 6000th aircraft Cirrus has produced, and therefore has some definite "appearance" upgrades (seats, trim, etc.). This aircraft has the G1000 panel with 12" screens, synthetic vision, infrared enhanced vision, air conditioning, built-in oxygen, ADS-B in/out traffic and weather, FIKI, dual AHRS, Envelope Protection, XM music and about a million other features. I was pretty excited to step on in and take it up!

My chariot for the morning!

Given that it was a breezy 32 or so degrees outside, Jeff gave me a brief (but still thorough) look at some of the exterior features of this airplane. I was especially interested in the stall protection designed into the wing, in a few distinct locations.

The wing root has a large vortex generator that controls airflow over the root of the wing. The first stall strip ensures that the stall starts there, inboard, and not further out.

I wonder how many people have accidentally stepped on that vortex generator? It's really perfectly positioned to be a step.

At about mid-wing there is a noticeable break in the leading edge that causes the outboard portion of the wing to have a lower angle of incidence than the inboard portion, so aileron control is maintained while the inboard portion is stalled. I got to test out the stall characteristics later in the flight.

Cirrus wings look funny, but it's all about stall control.

With all the custom appearance options, the interior was very nice. The seat was noticeably firm at first, but after some initial commenting, I did not notice or think about it for the rest of the flight. The 4-point harness made me feel secure, though it did have a tendency (as these do) to ride up if not adjusted tight enough. Maybe that's just a signal to tighten it? This harness was equipped with airbags in each shoulder strap.

Nice high quality leather and styling touches awaited me.

The back seat was the "60/40 Flex Seating" split seat designed for three passengers. Clearly for three to fit, these must be smaller passengers, children, or very friendly with each other. 

I cannot report on the comfort of the back seat!

As someone who flies "club" airplanes a lot, I really liked the ability of the G1000 to store up to 25 user profiles for screen setup and configuration. 
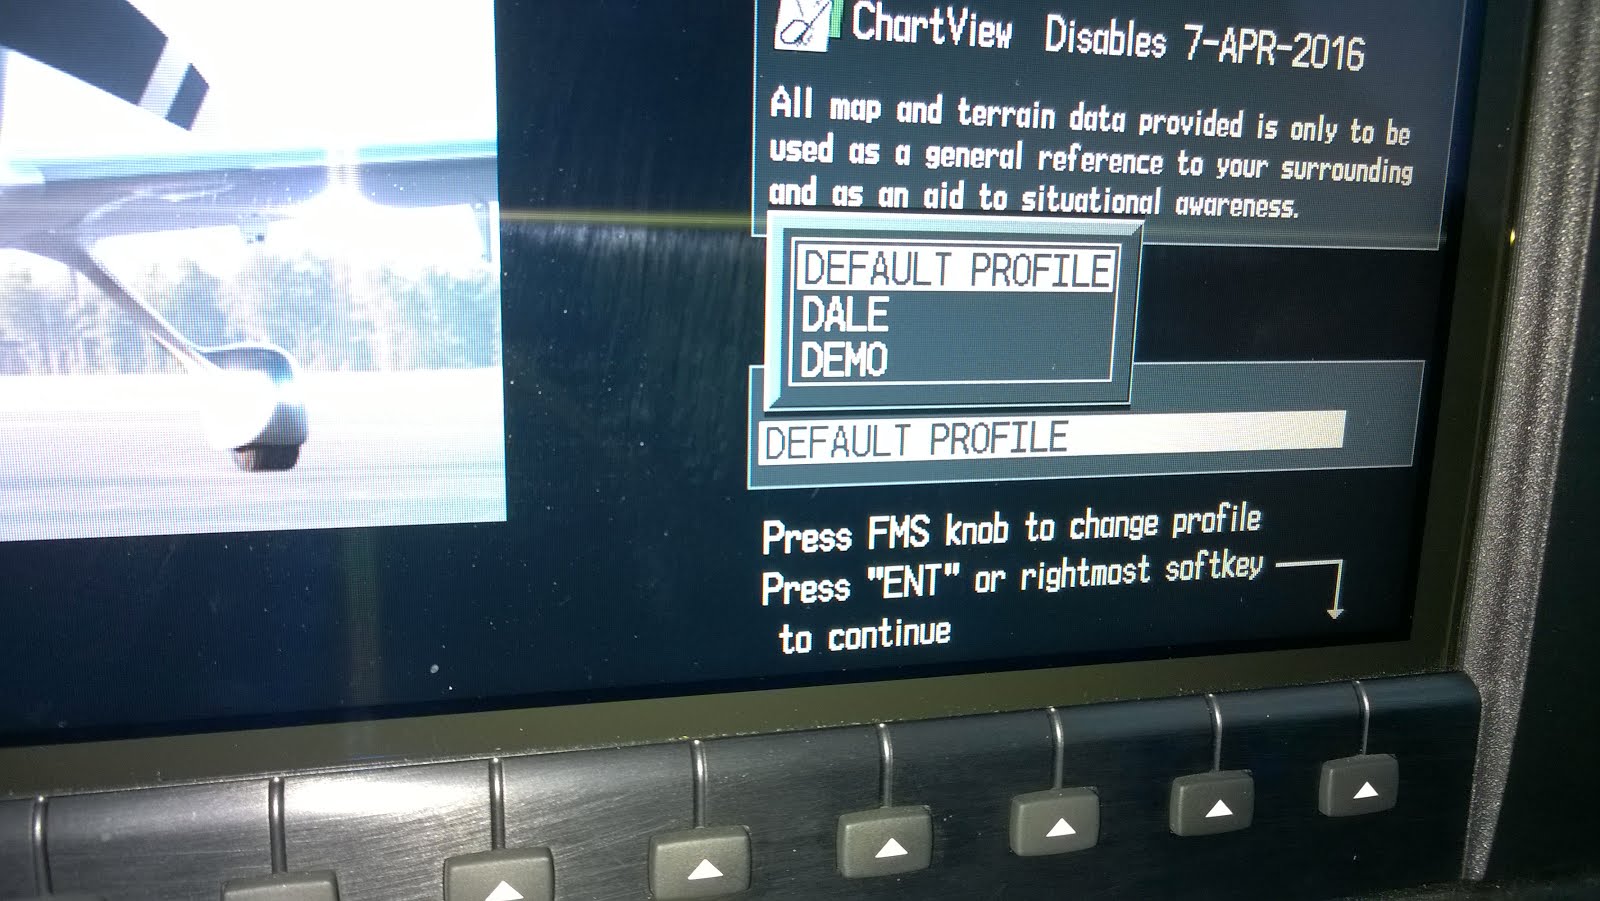
Want a different configuration for IFR and VFR? Local and longer flights? No problem!

I quickly figured out that this handle was not a door handle or something to pull on to help adjust my seat! This is, of course, the Cirrus Aircraft Parachute System handle overhead. The parachute has a minimum deployment altitude of 600 AGL. Above that, standard Cirrus training is for the parachute to be pulled immediately in the event of any serious malfunction up to 2000 AGL. Above 2000 AGL, Cirrus trains pilots to go ahead and troubleshoot before pulling the parachute.

Fortunately we didn't have to pull this, although that would have certainly made for a very interesting article!

What is this? An actual keyboard in a light single! No more twisting knobs to enter waypoints or frequencies. Most of the other radio and autopilot functions are replicated on this center console as well. Note the blue "LVL" button in the middle. More about that later. The keyboard would take some getting used to, as it's not a QWERTY layout. But it's still faster than turning knobs to enter airports or intersections.

Almost all of the controls you need within easy reach of your right hand.

Ah, standby instruments! Situated right above the pilot's knees. In this model, they are all digital. The altimeter setting can be slaved to the primary display, so you only need to set it once. Nice.

Previous versions had analog instruments, but these were all digital.

Okay, enough about the systems. You know that I was really ready to fly this thing! Due to a solid cloud layer from about 2800 MSL (1500 AGL) to 4000 MSL or so, we had filed IFR. The temperature was right around freezing so there was the chance of some ice - however with the TKS weeping-wing system this Cirrus is approved for Flight Into Known Icing. We quickly popped above the layer and tried to negotiate a block altitude and area for maneuvering from Oklahoma City Approach - but they weren't having any of that (unusual, I've requested and received this many times before). So we headed north 30 miles or so until we entered Kansas City Center's airspace and made the same request - no problem!

At this point Jeff ran me through a pretty thorough demo flight - explaining the capabilities, letting me experience the handling and systems, and stressing the myriad safety features on the airplane. 

First, cruise. At 10,000 feet, 30.3 inches of MP equaled 87% power (easy to set with the single-lever power control). This gave us 18.7 gph and a TAS of 183 kts, which is right at book value. As this is the turbo model, TAS gets faster up into the Flight Levels where 210+ KTAS is achievable. Obviously this is a high cruise power setting and 75% or 65% power settings will result in slower airspeeds but commensurately lower fuel burns.


On the MFD I need to point out the leaning procedure - you lean the mixture until the fuel flow is at the blue line (left side of the screen, 1/3 of the way down). That's it - simple.


Time for a little hand-flying, though. I found the stick forces and response to be both interesting and exciting. Gentle pressure on the controls resulted in equivalently gentle maneuvering of the airplane and it felt "normal". Move the stick a little more than normal, for quick maneuvering, and the whole personality of the airplane changed - response was quick, solid and immediate. More "aerobatic-like" than the traditional single-engine airplane feel. This is enhanced by the control system having a spring-return to neutral.

Handling and stability in the stall was fantastic. There was no tendency to drop a wing and the ailerons remained effective throughout the stall. This really felt like an affront to my traditional stall experience, as I teach using the rudders to keep the wings level in a stall for the usual reason of spin avoidance. But in this airplane, it was no problem. Sure felt weird though.

The Perspective system includes Garmin's "Electronic Stability and Protection" system, ESP, which I got to give a thorough workout. This system "helps" the pilot avoid unusual attitudes by assisting in returning the airplane to normal attitudes using the autopilot servos (even though the autopilot is off). With the ESP system on, banks of up to 45 degrees are normal. Past that the airplane pushes back, and keeps pushing until bank is at 30 degrees. This push is definitely noticeable but easily overcome if you want to - just push the stick a little harder and it will let you do what you're trying to do. However, there will be no mistaking that you are exceeding its built in parameters. The same is true for pitch, with different limits. The ESP system can be temporarily disengaged by simply holding the autopilot disconnect button on the stick, if needed for maneuvering.

Jeff did an interesting demo of the ESP system. While holding the plane level, he increased the aileron trim to full left, trimmed full nose down and added full power. When he released the stick, the airplane immediately rolled to the left and the nose pitched down as expected. (I say "as expected". I lie a little. Although he warned me what it was going to do beforehand, and conceptually of course I knew wat was going to happen, having an airplane roll hard to the left and dive with nobody holding the controls was certainly weird and a little uncomfortable.) Once it got past 45 degrees of bank, the airplane tried to right itself in bank. Simultaneously, as the nose lowered and the speed built up rapidly, the airplane tried to fix that too, using the only tool it had available - pitch (no autothrottles, yet). The aircraft pulled up surprisingly hard in an attempt to limit the airspeed gain - I'd say about 2 g's but can't find that in the POH. After a few oscillations it returned to a "normal" pitch and bank attitude and held it there. Not to straight and level flight, but within the established parameters for pitch and bank.

That's what this next thing is for - the GFC 700 autopilot has the "blue level button" which I got to press a couple of times. It does as advertised - returns the airplane to straight and level flight from whatever strange attitude you've managed to get into. More than just an emergency button though, I could see it as useful when hand flying and having to copy down an ATC clearance or other similar temporary distraction.

I really like these features from a safety standpoint. It would be very hard to not notice getting into an unusual attitude (for example through spatial disorientation), and the airplane would keep trying to get you back to normal, both helping you and giving you the tools to do it yourself. Great stuff.

At this point I really wanted to see the airplane on approach, especially the "Highway in the Sky" symbology since the last aircraft I flew with a G1000 didn't have that option.

Back into the cloud deck, we did pick up just the slightest trace of rime on the leading edges. Not enough to bother with engaging the TKS system, though of course we watched it closely for further accumulation.

Just the tiniest little bit of ice if you look closely.

Cleared for the RNAV (GPS) RWY 35R approach into Wiley Post (KPWA), we intercepted the glideslope and started on down. Of course the autopilot is fully integrated and can fly the whole procedure hands-off with the pilot only making power changes and then flaring to land. But I was most interested in the "Highway in the Sky". "Flight simulator" computer programs as far back as the 1980's had HITS depictions as a "futuristic" guidance option. Well, now it's the future, and HITS is here! When hand flying an approach, all the pilot has to do is keep the flight path marker (green circle with crosshairs) within the magenta squares, pointed at the runway and it will be a perfect approach every time.

With all these navigational aids, it would be hard to go wrong.

Short final was flown at 80 kts, and the landing was straightforward and uneventful (fortunately!) with a different sight picture than many single-engine pilots are used to. The nose drops away and the panel is low, so the impression is that you need to pull back more than you really do. It's like some twins in that regard - you feel like you're landing flat but you aren't.

A few takeaways:
- I can see why these airplanes are so popular. 
- The integration of all the aircraft systems was amazing to me. Like many pilots I am used to an almost random array of instrumentation from different eras and manufacturers in the airplanes I routinely fly. In this airplane, everything talks to each other.
- The handling was enjoyable. The sidestick took exactly zero time to get familiar with.
- The seating position felt a little odd at first (very high up for me). I did wish the seats had more adjustability, but I stopped noticing as soon as we started moving and promptly forgot about it, so apparently this wasn't as big a deal as I thought.
- I can't believe I forgot to test the enhanced vision system!
- Getting in and out of the airplane took a different routine than I am used to and I'm sure I looked funny doing it.
- This aircraft would be a great (and quick) way to travel. 180+ KTAS and long range will get you many places.
- I need to convince Cirrus to let me evaluate this aircraft on a longer flight - with my wife. Say to Florida. Or Phoenix. Or anywhere warmer than Oklahoma this winter.

Many thanks to Jeff and Cirrus for giving me this great look into the capabilities of a fantastic airplane!

Thursday, October 22, 2015

Why is the LNAV/VNAV DA sometimes higher than the LNAV MDA?

Sometimes this instrument stuff just doesn't make any intuitive sense, does it? You’ll see an approach chart with minimums like these:
  

The LNAV MDA and visibility are lower than the LNAV/VNAV DA and vis! We “assume” that because the LNAV/VNAV offers a glideslope, that it must be better than the LNAV. “Better” is a subjective term of course, but in this case it doesn’t mean “lower”.

Why?

Well, let me tell you. Here’s where it gets a little involved.

(Note: The vast majority of LNAV/VNAV procedures out there were evaluated using the criteria in FAAO 8260.54A. While this has been replaced by the 8260.58, the concepts and calculations are similar. I will use the 54A in my examples below, since that’s what most current procedures are based on.)

It’s really all a matter of WHERE the most significant obstacle in final is located. This is called the “controlling obstacle”, and is the one which causes the highest MDA or DA.

For a non-vertically guided approach, like an LNAV, Localizer, or VOR, the evaluation can be very simple. Find the highest obstacle in final, and add 250 feet to it, then round up:

Yes, that's the Eiffel tower. Why not? Note: not to scale!

That’s your MDA! (It’s not always as simple as this, but it can be. I’m leaving out some details for brevity.)

But what about a vertically-guided approach? It’s different for LPV and ILS than it is for LNAV/VNAV, and LNAV/VNAV has some serious handicaps. LNAV/VNAV was originally designed for use with barometric altimetry – meaning that the “glideslope” you would follow was calculated by your FMS using barometric pressure – basically an internal altimeter – NOT an electronic signal. For the most part, only business jets were ever equipped with this technology. Also, we know that altimeters have many errors as a result of non-standard temperatures.

See HERE and HERE for more discussion on that topic.

This was called “Baro-VNAV” and the formulas have to account for varying temperature limits. That’s why you’ll often see in the notes for an RNAV (GPS) approach procedure something like this:


The errors introduced here require a little more “cushion” when it comes to obstacle clearance, so instead of something nice and simple like the LNAV evaluation, the evaluated area is composed of two general regions:


That flat part of the dashed red line extends about a mile from the runway threshold, dependent on altitude and how cold it gets at that airport during the winter (yes, really). If there are no obstacles that penetrate that dashed red line, then the LNAV/VNAV will get great minimums. But if an obstacle DOES penetrate, then the DA is highly dependent on WHERE it penetrates and by how much. An obstacle that penetrates that flat area has a comparatively small effect. However, an obstacle that penetrates the sloped portion can have a significant effect on DA.

The new DA is determined by placing the DA at a point on the glidepath above where the obstacle clearance surface is at the same height as the obstacle. Now that’s a mouthful, a picture hopefully is a little clearer:


Whatever the glidepath height is at that distance from the runway, well, there’s your DA.

It works out that an obstacle that penetrates the surface within a mile of the runway will usually not cause the LNAV/VNAV DA to be higher than the LNAV MDA. But an obstacle that penetrates more than a mile out will! So when you see this situation occur, you know there’s an obstacle maybe 1-2 miles from the runway. If the obstacle is further away than that, the DA gets really high!

Okay, clear as mud. But what about that visibility value?

Fortunately that’s a little easier to explain.

Visibility values are set so that the pilot has at least a reasonable chance of seeing the runway from the missed approach point. Hopefully sooner, of course, but at least by then. On any vertically-guided approach, this is pretty straightforward – how far is the airplane from the runway at the DA point? Convert that to statute miles, and there’s your visibility.


At approximately 318 feet per nautical mile for a 3 degree glidepath, a Height Above Touchdown (HAT) of 688 ft as in the example above gives a distance, and therefore visibility, of just shy of 2.50 sm. So it’s rounded up to 2 1/2, and published. Approach lighting systems, if installed, get figured into this too, essentially by subtracting the length of the approach lights from the calculated visibility. It’s all in a table that the procedure developers refer to.

For non-vertically guided procedures, however, there is no “DA” point, and most often the MAP is either at the runway end or relatively close to it (sometimes past it on a VOR procedure). For these procedures, the visibility is determined one of two ways. For Cats C and D, the same table as for vertically-guided approaches is used, so the visibility is the same for a given HAT.

For Cats A and B though, a different table is used, and is greatly simplified. A basic visibility of 1 sm is used until HATs start getting over 740 ft for Cat B and 880 for Cat A, at which point it starts increasing. So you will see many, many LNAV (and LOC and VOR) approaches with 1 sm of visibility. Since many Cat A and B aircraft are capable of making a perfectly safe descent at steeper than 3 degree glidepaths, the lower visibility requirement actually gives them a little more flexibility than the faster aircraft.

Like before, approach lights can help here too. There are some other limitations as well.

To briefly recap:
1. The LNAV/VNAV DA may be higher than the LNAV DA if the obstacle is sufficiently far from the runway due to the geometry of the evaluated areas. This is a result of the original design of Baro-VNAV.
2. The visibility values are calculated differently because the approaches are flown differently, and therefore LNAV visibility for Cats A and B will often be less than the LNAV/VNAV Cats A and B.

Simple, huh? I hope this answers some questions about this seemingly strange situation!

Monday, July 13, 2015

My ATP checkride

On Saturday, 7/11/2015 I took and passed my ATP-AMEL checkride! Like many others, I needed to get it done before my grandfathered-in written test expired next summer. Here's a little write-up on how it went.

My examiner was a well-known DPE from Tulsa, OK, Jennifer Wise. The aircraft was a very nice and well-equipped 2011 Beechcraft Baron G58 from Oklahoma Aviation at Wiley Post Airport in Oklahoma City, KPWA.

My ride for the ride!

It's hard to see, but if you look near the right bend of the pilot's yoke, you'll see a little switch labeled "A/C". Yes, it had air conditioning! I never want to take another checkride without it...

Training: 

As mentioned, I trained out of Oklahoma Aviation at PWA. My instructor (Bret Wyatt) and I met on Tuesday and worked in their Redbird AATD for the first 3 days, a couple hours a day. The Redbird decently replicated the power settings and configurations of the Baron, and the G1000 panel was close enough to the real thing to be a good training tool. On Friday, 7/10/15 we went on two flights in the airplane, running through all the required maneuvers for the checkride. By the end of the second flight I felt comfortable and ready for the practical test.

The morning of the checkride Bret and I flew the aircraft to Tulsa/Riverside Airport, KRVS, where we met the examiner in her office (she was the only examiner in OK able to do ATP checkrides in a Baron).


Ground portion:

We had been told that an FAA inspector would probably be observing this checkride as part of the examiner’s annual requirement, however he was not there yet so we got started with some of the paperwork. When he showed up he briefed that in addition to the usual three possible outcomes of a checkride (pass, fail, or discontinue), there could be a fourth outcome – the examiner herself failed his observation and he would have to take over conducting the checkride. I can only imagine how painful that would have been!

The oral examination was pretty straightforward except for one thing – the weight and balance and resulting performance calculations. You see, with him on board, with the fuel load we had, we were going to be over max gross weight by a decent margin (about 50 pounds). He was insistent that he had to ride along on the checkride, so the examiner and I were trying every which way to figure out how to do it. She asked if we flew for a while by ourselves and burned off some gas, then came back and picked him up to finish, if that would be okay and he eventually agreed.

Still, at just below max gross weight the performance numbers were not too exciting, even with 300 hp per side. It was a pretty warm day which negatively affected takeoff and climb performance. Our main concern was the accelerate-go distance, the distance it would take for an engine to fail right after liftoff and for us to be able to climb to 50’ AGL. At max gross it was about 9100 feet. The runway at Riverside is about 5100 feet long, and there are some takeoff obstacles listed in the departure procedures that are closer than 4000 feet from the runway. Even worse was the situation at Okmulgee (KOKM), where we planned to go for approaches and landings. So it was a reasonable safety call for us to fly most of the checkride without him, and he reluctantly agreed to just observing one takeoff, one approach and one landing.


This is the departure procedure at KOKM. Note the takeoff obstacles listed for RWY 18 - 100 foot trees 1303' from the end of the runway, or just about 6300 feet from the beginning. With a 9100' accelerate-go distance, this was an actual concern.

The rest of the oral examination consisted mostly of questions about the various systems onboard the airplane – describe the fuel system, the landing gear system, what type of anti-ice and de-ice systems does the airplane have, that kind of thing. I was well-prepared for these questions both as a result of reading the POH and a great publication on the G58 produced by the FlightSafety company. She asked a few questions for clarification but there were no surprises. Really, she went right down the list of systems in the PTS. Couldn't have asked for more straightforward!

I will add that the ATP written test and the ATP oral exam are completely different. This was really welcome news. The ATP written was full of arcane questions like “how many flight attendants are required on an airplane with 235 seats if only 150 are occupied” and location of emergency flashlights and such. The oral exam only covered the systems and performance for the airplane being used. Thank goodness!

Flight portion:

(Note: as far as I can tell, we performed all the required maneuvers from the PTS. If I left something out it’s probably just me forgetting about it. Also, virtually all of this checkride is done “under the hood” so I had the foggles on most of the time except for takeoff and landing, and during circle-to-land maneuvers.)

The examiner and I got in the plane and taxied out, leaving the FAA inspector to join us later. Lined up for takeoff on 19R, advanced the throttle, accelerated down the runway, liftoff, gear up, and whoosh - the door came open! (Really, it wasn’t an examiner’s trick.) The airplane, like most small airplanes, flies perfectly fine with the door cracked open, it’s just noisier inside. She had closed it before takeoff and it felt secure to me, but the Beechcraft door locking mechanism is a bit tricky and takes some getting used to (I’ve had it happen myself with a student in a Bonanza). We were already climbing out, so she asked me if it was alright if she called an “audible”, changed our plan (did I really have a choice?), and instead of airwork first, we go do a single-engine ILS RWY 18 approach to landing at KOKM as our first item. Sounded like a good idea to me, so I set up the procedure and she gave me vectors, “failing” the engine somewhere before the FAF and setting zero thrust (the power setting that simulates the reduced drag of a feathered propeller). Although I couldn’t use the autopilot for this approach, the G1000 avionics, flight director and synthetic vision make simple work of staying on course and glidepath. The approach and landing went well, we exited the runway and then got the door solidly closed.


As if having a flight director didn't make it easy enough to fly an ILS, keeping the flight path marker (green circle) right on the runway makes for a perfect approach anyway! (This was taken prior to the checkride and using the autopilot to get the picture, but hand-flying was almost as easy.)
We started our takeoff roll and she “failed” an engine again with the mixture control while on the runway. I brought both throttles back and braked to a stop, maintaining centerline and runway heading reasonably well.

She gave me back the engine and we took off again. After departure she provided me with vectors for the ILS RWY 18 again, but with both engines this time. During the ATP checkride, if the airplane has an autopilot, you are expected to use it for some of the approaches under the idea of “automation management”. Each approach I would ask “can I use the autopilot” to make sure I wasn’t making it harder than necessary! Fortunately this airplane had the fully-G1000-integrated GFC700 autopilot, which is a fantastic device. I basically just watched it do its thing all the way down final. Upon reaching DA she told me to “go visual and land.” At about 50 feet AGL she tried to make up some reason for me to go around, and it came out as “elephants on the runway”, which made us laugh – good as a tension reliever anyway! So I went around and climbed back up, putting the foggles back on, back into the fake clouds.

This was followed by the missed approach into the established holding pattern at the OKM VOR. After entering the hold, she gave me vectors and a climb out to the west for airwork.

The next items were in about this order:

- Steep turns. These were 180 degrees of turn to the left at a 45 degree bank angle, followed immediately by 180 degrees to the right. These were no problem due to the power settings I had figured out in practice – 18”/2300 rpm gave about 140 kias at the entry. When rolling into the turn, bringing power up to about 21” and adding back pressure held it right on airspeed and altitude. But the best part was the flight path marker displayed as part of the G1000 synthetic vision system. Keep the flight path marker on the horizon line, and the airplane will easily stay within 20 feet of altitude.

- Stalls. A series of three stalls is required – clean, landing, and takeoff configuration. One of them was while in a turn. These were conventional and not much different than those on the Private Pilot checkride, except the recovery was to take place at the “first indication” of a stall.

- Unusual attitudes. We did two unusual attitudes, one in a nose-high turn and one in a nose-low turn. She had me tilt my head down and close my eyes while she set up for these. The first one was recovering using my primary instruments (the G1000), the second one was using the standby instruments (standard attitude/altitude/airspeed indicators, but way over on the far right side of the panel).

- Engine shutdown and restart. She “failed” an engine on me and had me go through the actions required to completely feather, shut down, and secure the engine, then start it back up again. I paid careful attention to heading and altitude control since those are what she’s really paying attention to.

- Emergency descent. I think she just told me “let’s see an emergency descent”, so I brought the power to idle, gear and flaps out (at appropriate speeds), and rolled it over into a 45 degree bank, maintaining airspeed near the top of the white arc, just like I teach my students in an engine fire scenario, for example. This resulted in a pretty rapid descent, so we made maybe only a full turn and she had me roll out.


That was about it for the airwork, and we had one more approach and landing to make before picking up the FAA inspector. She had me call Approach Control to get vectors for the KRVS RNAV (GPS) RWY 01L, circle to land. This was flown with a simulated failure of the Primary Flight Display, which was simulated by her covering it up. I went to reversionary mode on the G1000 and used the Multi-Function Display to fly the procedure. I think I probably used the autopilot on this one as well, but maybe not. We were instructed to circle to the east of the runway. In actual instrument conditions this is prohibited by the approach procedure, and for good reason – once I got down to the Circling MDA and went visual, there I was staring at the CityPlex towers near Oral Roberts University (anyone familiar with Tulsa will know what I mean) sticking 648 feet up from the ground about 1.3 nm east of the runway. She told me to just fly my downwind inside that tower which is a local procedure.

That tower rises far above anything within the immediate vicinity and sure looked close once I took off the foggles!
We landed and taxied back in to pick up the FAA inspector. Since she hadn’t told me I had failed, I knew I was passing up until this point. Just a few more minutes to go, but with double the sets of eyes watching me! Since this airplane has rear passenger doors behind the wing (and therefore well clear of the engines), we had coordinated that he would just come on out and climb on board with the engines running. Of course I verified his seatbelt was fastened the best I could, and knew that his visibility would be limited since he was sitting in the rear-facing middle row.

After takeoff, I contacted departure and was cleared direct to the GNP VOR a few miles south of the field for the full VOR RWY 01L procedure with a circle-to-land. Somewhere in here the FAA inspector unbuckled, turned around and took up some kind of kneeling-on-the-seats position so that he could watch. Quickly setting up the approach, I let the autopilot fly the published procedure turn via GPS courses. Established back inbound, I elected to fly the final approach course by hand, for one reason only – I knew I had to switch the CDI from GPS to VOR mode for the final approach segment (and announced that I was doing this), but I didn’t want to accidentally get into some weird autopilot mode depending on my timing of this change. Admittedly, this just wasn’t something I had done in this airplane, with this autopilot and equipment, so was I hesitant to try something new at this exact moment. I knew I could easily fly it by hand, though, so that seemed the safer way out.

Tower instructed us to break off the approach before I was down at MDA, and to circle to the west for RWY 19R. At that point, to comply with passenger seatbelt regulations, I had to tell the FAA inspector that he needed to turn around and put his seat belt back on. My landing went pretty well, we taxied back in, and I was able to finally relax – I had passed!

Debrief was pretty short, which is exactly what you want I suppose. She said I did well (obviously well enough anyway) and we finished up the paperwork!

Total time in the airplane maybe about 1:45, which includes taxiing back to pick up the FAA inspector. The ride went very quickly, especially since the Baron gets between airports and approaches in no time!

My overall impression of the examiner (Jennifer Wise) was that she made me feel very comfortable. Especially given the difficult circumstances with the extra observer, she made me feel relaxed and at ease. She was friendly and the quizzing during the oral and flight portions was conversational in nature. She was able to find out that I knew the material, without having to resort to trick questions or impossible scenarios. Highly recommended!


A few general notes about the checkride and really instrument flying in general. I used the power setting information available from the American Bonanza Society (they handle Barons too). Flying by-the-numbers was critical to being able to free up extra brain cells for other tasks. For instance, on an approach I used 17”/2500 rpm until just prior to the FAF. Then it was flaps to approach and gear down  to descend down the ILS. This resulted in almost exactly 120 kias and a descent rate that kept me right on glideslope. On a non-precision approach, at MDA bring it back up to 22” (since now the gear is down it takes more power to stay level). Reliable 120 kias all the time. I already mentioned the settings for steep turns. It’s the way I teach my instrument students to fly, and it really works well. Figure out the numbers for your airplane and speeds and try it!

Friday, March 27, 2015

"What's it doing now?", or GPS turn anticipation-gone-wild...

I was on a recent flight with an instrument student in a very well-equipped Bonanza that provided a very instructive example of a few things:

1. Know your avionics equipment.
2. Know your autopilot.
3. When flying instruments, slowing down is your friend!

We were headed from Wichita, KS (ICT) to the Stillwater, OK VOR (SWO) in more or less a direct routing as part of the required “long IFR cross country”. The intent was to fly the KSWO VOR RWY 17 with the procedure turn and everything for training purposes. Kansas City Center provided us with “direct SWO VOR” and “maintain 4000 until established”.

Our approximate course:


The procedure for reference:


Now, this is in an area where Center’s radar coverage does not go all the way to the ground – that’s why the clearance was only down to 4000. You may also notice that there is a feeder route from the PER VOR to SWO VOR published at 3000. Though we were close, we weren’t actually on the PER-SWO route, so we had to maintain 4000 as assigned. In addition, I wanted us to start at 4000 - it would set up a great scenario for the “slowing down and going down” dilemma faced by faster, slipperier airplanes – you can descend OR slow down, but it’s hard to do both at the same time. Being at 4000 once we started the outbound procedure turn, then down to 2600, then down to 2100 once inbound could mean a lot of juggling and planning of power settings and configuration changes (as we all know, CFI's love to inflict this kind of torture…).

We descended to 4000, but hadn’t slowed down yet – we still had a ways to go, after all. Eventually the GTN 750 showed about 10 miles to go to the VOR, and we were doing around 155 kts GS (and airspeed too, it was pretty calm). The GTN's CDI output was in “GPS” mode – appropriate for this phase of the flight, and the autopilot was in GPSS mode, following the GPS course exactly.

Note - the following screen captures are from Garmin's GTN 750 simulator - so they're not from the real flight. However, they're representative of what was going on and pretty accurately depict what was happening.


At about 10 miles out, the pilot told me he’s going to start slowing down. Okay. Shortly thereafter, the GTN then shows us the following course:


Holy turn anticipation, Batman! The GTN plotted a course that would turn before the VOR (as expected) to intercept the procedure turn outbound course. However, due to our ground speed and the angle of turn, it had to lead the turn by several miles. (If you're interested, the turn radius of a standard-rate turn at 155 KTAS is about 5000 feet, so twice that to make essentially a 180-degree turn). This several-mile lead turn would make us roll out on the procedure turn outbound PAST where the GPS had also calculated we should have finished the procedure turn and been back inbound (dashed white line). Notice the "miles to go" in the bottom right corner (7.4nm) is still showing the distance to the VOR. How far until the turn starts is not depicted.

At this point the pilot realized he'd sure better get slowed down. The Bonanza is pretty slippery, of course, and we were only able to drop a few knots by the time the turn started. We elected to leave the autopilot on to "see what it's going to do" now - something I wouldn't have recommended in actual IMC, but a possibly informative moment in training.


The GPS started around the turn as expected, and rolled out on the PT outbound course. The GPS auto-sequenced to now highlight the PT course. Notice that we have not yet started the PT yet, and are at the end of it - we should be pointed the opposite way. Also, our TAS (GS) is still pretty high (105-110 is normal in the Bonanza) because of the previously-discussed need to descend and slow down simultaneously:


Now I was really intrigued - how is the GPS going to get out of this? Keeping in mind that GPS-steering essentially tries to correct left/right deviations from course - and at this point we are well left of the intended course, which is over a mile southeast of us at this time. So it should correct to the right, right?

And it did!


At this point the programming of the GPS apparently decided we must have already completed the procedure turn and therefore should be inbound, as it did two things - one, it highlighted the inbound course as our current leg, and two, it kept us turning around to the right to intercept, the "opposite" way that a PT is normally flown:


Finally, having intercepted the final approach course, the GPS and autopilot did line us up nicely on final:


Back on course, the pilot switched from GPS to VLOC mode and the mean instructor made him turn the autopilot off and hand-fly the rest.

I love educational moments like this! There were several lessons to be learned:

- SLOW DOWN! There's never such a thing as slowing down to approach speed and configuration too early, especially when you have a big turn coming up. Had we been down at 105-110 KTAS before the first turn started, the turn radius would have been much smaller and the outbound course would have been intercepted in plenty of time to perform a "normal" PT.

- PLAN AHEAD! An approach briefing is more than just reading the altitudes and heading off the chart. Know where you are on the chart. How are you going to get into the approach? What altitude? What are you going to have to do to make that altitude? When to slow down? How much turn? Lead it or don't lead it?

- Don't give up CONTROL to the machines! If you don't know what "it" is doing, whether "it" is the GPS or the autopilot, take over and fly it by hand. I had no idea how this was going to turn out, and I wouldn't have wanted to find out in actual IMC.

- As much as you can, KNOW your equipment and how it functions. Sadly, I looked in the GTN750 pilot's guide and couldn't find much about how it calculates turn anticipation, or at what point it starts showing it (note that the first picture above doesn't even show the turn yet).

Lots to learn in this flight, but that's one of the main purposes of the "long IFR XC" in training. I'd say mission accomplished!

Wednesday, February 11, 2015

Flying "teardrop" procedure turns

An interesting situation was brought to my attention a few days ago by a reader (and former instrument student). He (for reasons known only to him) decided to fly the RMN ILS OR LOC RWY 33, in the simulator, using only one VOR and an ADF. Yes, your guess as to why is as good as mine. However, he (correctly) identified that the turn radius depicted by the initial segment starting at HIGAP and arcing to (AFUWY) is way larger than needed in the airplane he was flying (a typical four-place single).


Let’s talk about this type of procedure turn a bit, since you don’t see them very often. Actually, many pilots studying for the instrument written for the last 10 or 20 years have probably seen one at least once, as the Duncan, OK (DUC) LOC RWY 35 used to be an example procedure on the test, and used to have this type of procedure turn. However, it has since been modified and has a (regular) procedure turn. And may not be on the test any longer, though I’ll have to defer to those of you studying for it to let me know about that.

Regardless, it had the same geographic setup as RMN – a VOR a few miles away on final, but offset to one side a couple of miles. How to use it to get turned around and lined up on final? This is a situation where the teardrop procedure turn can be used by the procedure developer. Essentially, from the BRV VORTAC you fly the 122 radial outbound until 10 DME (or intersection with the 279 bearing to EZF), then begin a right turn around to intercept the final approach course on the localizer.

Of course, that turn radius depicted has to cover all speeds of airplanes, right? Accordingly, it is WAY larger than you would need for a light single-engine airplane. If you measure the distance between HIGAP and (AFUWY), it’s about 5.7 nm, meaning a turn radius of half that. But what is the turn radius of, say, a Cessna 172 at 90kts in a standard rate turn?

(Note – way geeky content ahead. CLICK HERE to just skip ahead to the answer and keep reading from there.)

You can easily figure this out if you pull out your copy of “Aerodynamics for Naval Aviators”. What, you say you don’t have one? Of course you do, this is 2015 after all:

https://www.faa.gov/regulations_policies/handbooks_manuals/aviation/

This book really has a lot of good stuff in it, which is why it’s still used as a reference, unchanged, since 1965. A quick (?) browse will take you to page 178, which has formulas for turn radius and turn rate. As we are in a standard rate turn, we know our Rate Of Turn (ROT) is 3 degrees per second. What we need to determine is our bank angle from the second equation, then use that in the turn radius formula.


In the second question, solving for phi:


Using V = 90 KTAS and ROT = 3 degrees per second, phi (angle of bank) = 13.9 degrees.

Inserting phi = 13.9 into the first equation gives us a turn radius of……….

2907 ft.

Alternately, you can use Figure 2.29 on the next page if you prefer a chart format. Notice there are two sets of “bank angle”  curves, you use one to solve for radius and the other for rate. Since we know rate, we can work backwards from there. Personally, I prefer the formula method, but that’s me.


Okay, so if you skipped right to here, the radius of a standard rate turn at 90 KTAS is about 2900 feet, or about 1 nm in diameter.

So back to the RMN ILS teardrop – if we entered a standard rate turn at HIGAP, we would be well right of the final approach course after completing the turn. So how to combat that – fly a half-standard-rate turn? Quarter standard rate? No, no need to try to stay on the line – it’s not a DME arc. Instead, begin your turn at HIGAP but then roll out to establish a normal intercept angle to the final approach course. Don’t worry, that whole area between the outbound and inbound legs has been evaluated for obstacles, and as long as you stay at or above 3000 feet until on final, you’ll be safe.


Remember the effect that wind might have on your ground track – a north or northeast wind will tend to push you toward final quicker than normal, and a wind from the west will have the opposite effect, “holding you back” from intercepting the final approach course. The segment between HIGAP and intercepting final is essentially a dead-reckoning course.

Alternately, another solution could be to fly a 10 DME arc from the VORTAC - but obviously this would only work if the facility had DME and the value was published. 

I know what you’re wondering, because I was too. What true airspeed would allow an aircraft to maintain that arc in a standard-rate turn (no wind)? I calculate about 536 KTAS (the method how is left as an exercise for the reader). Not too likely in a Skyhawk, and even more, a “standard-rate”, 3 degrees per second turn at 536 knots requires a bank angle of about 56 degrees. That’s “slightly” past the limit for passenger comfort in commercial air travel, and 536 ktas is “slightly” above the speed limit of 250 KIAS below 10,000 feet anyway (yes, I know, the speed limit is “indicated airspeed” not “true”, but c’mon now).

So what’s the deal with this huge turn radius on the approach?

Above about 180 KTAS, a standard rate turn requires greater than 25 degrees of bank. As a result, faster aircraft use 25 degrees of bank as a maximum, regardless of the “degrees-per-second” that result. (Note I am not a jet pilot, but this comes from AIM 5-3-8j6, which admittedly only references holding patterns. Please correct me if I am wrong.)

At 25 degrees of bank, the speed necessary for that 4.7 nm diameter circle is “only” 273 KTAS. Still pretty quick, but not out of the realm of possibility at the maximum 250 KIAS, depending on atmospheric conditions!

This type of teardrop used to be seen quite often on the military “HI” approach charts, where the idea was to cross the field at a high altitude then have an outbound and inbound leg long enough for the descent – a “high-altitude penetration turn”. But even then, many U.S. military bases do not have them anymore. I’ll have to defer to any military aviators who read this to let me know why.

I have no idea how many of these teardrop procedure turns are around. It doesn’t seem to be very many, and the number is likely getting smaller as the teardrop is replaced with other options. But if you see one, now you know what it’s all about!

Tuesday, January 13, 2015

"Higher in a minute" vs. "Climb via the SID"

This isn't really a TERPS article like most of the rest of mine, but it's an important point that a friend's recent corporate jet flight out of Teterboro, NJ brought up.

Here's what happened:

He was cleared to depart runway 24 using the TETERBORO NINE departure, then to "climb via the SID, expect FL xxx 10 minutes after departure...". The TEB9 departure requires a couple of intermediate level offs before climbing up to your cleared altitude:


After takeoff, having leveled off at 1500 on heading 280, but prior to reaching 4.5 DME, ATC told him in the initial call, "Off of Teterboro, N12345, radar contact. Higher in a minute." In typical NYC-area fashion, the other nonstop radio communications prevented any immediate clarification.

His question was the same as mine and yours - what exactly does the controller mean by "higher"? That's not standard phraseology. Higher than what in a minute? Typically something like this would be used when a delay is expected to the final altitude, FL xxx in this case. But since in this case there are some intermediate altitudes, there are essentially two possibilities:

1. I can't clear you to FL xxx right now, but can soon. Since you were already cleared to climb via the SID, climbing to 2000 is fine but I'll have your "higher" altitude in a minute.
2. I want you down at 1500 feet for now, don't climb up to 2000 yet. I can get you "higher" than you are currently in a minute.

Who really knows what ATC wanted? The pilot chose (wisely) to assume the worst and stay at 1500. Fortunately, immediately upon crossing 4.5 DME he received a climb to 11,000, so the issue resolved itself without any further difficulties.

The FAA has recently (April 2014) been implementing new "Climb via the SID" terminology, which in large part is designed to reduce this kind of ambiguous situation. However, it actually caused the confusion this time.

NBAA has a great write-up and slideshow briefing on "Climb via" (and its sibling "Descend via" for STARs) at the following link. It's worth a read if you fly anywhere that you're commonly issued SIDs and STARs.

http://www.nbaa.org/ops/cns/pbn/climb-via/

Notice that subsequent altitude assignments effectively cancel the "climb via" authorization. A case could be made that in this example, that's exactly what happened.

But I think the most important thing to take out of this scenario is what we all learn in Private Pilot training - if you don't understand what ATC wants you to do, don't assume, ask! If the frequency is so busy that you can't get in a word, then use good judgment and take what action is necessary. In this case, the PIC and SIC both decided they would stay at 1500 - in my opinion, the absolute right move.

A long time ago (yes, in a galaxy far, far away too), someone told me that whenever you're trying to decide to doing something that you're not sure about, think how you would sound trying to explain your decision to a jury (or the NTSB for example). "Well, the controller told me 'higher in a minute', so I went ahead and climbed from 1500 to 2000 because I thought he meant I could go higher NOW, but even HIGHER in a minute." Doesn't sound very convincing, does it?

It may very well have been what the controller wanted, but we don't know. Good communication is the key!

Thursday, November 13, 2014

"Diverse Departure" procedures

I've written about various types of departure procedures before - VCOAs here and the option for Part 91 operators to take off in "0/0" conditions here.

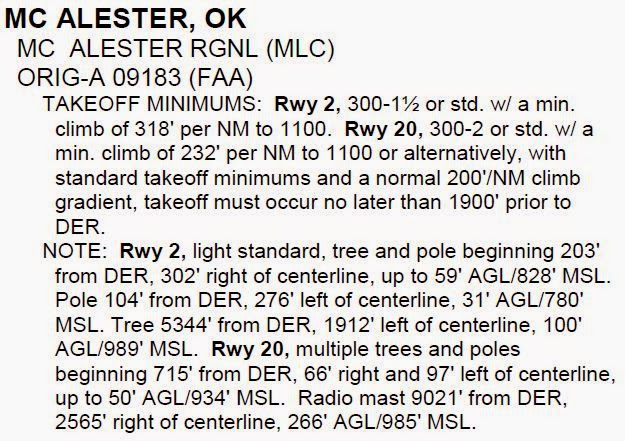
But I recently received some questions from a friend and reader based on a recent flight of his from Denton, Texas to McAlester, Oklahoma (MLC) and returning, which you can read about on his blog at pilottangocharlie.blogspot.com. After stopping at MLC, he got his clearance which consisted of the MLC VOR as the first fix. There were some real instrument conditions around, so this was a for-real instrument departure. But the only departure "procedure" that is published for MLC is a set of takeoff minimums. He realized this situation wasn't covered real well in his instrument training, and needed a little refresher on how this works.

I can sympathize! My instrument training was in southeast coastal Virginia, where the flat terrain makes Obstacle Departure Procedures (ODP's) purely an academic exercise for the most part. Add in that radar coverage was excellent and most IFR releases simply started with "Fly runway heading..." and the result was that ODPs were not covered very well during my IFR training (in fact, they may not have been covered at all). In my experience this is pretty common, which is unfortunate because every flight starts with a departure!

McAlester actually has a good example of a basic textual obstacle departure procedure (or lack thereof):


From Runway 2 it has a pretty typical set of takeoff minimums or a minimum climb gradient. This situation I covered in my "0/0" article, so I won't go into it here. But remember that while these takeoff minimums aren't required for Part 91 operations, they are a REALLY good idea.

From Runway 20 there are the same two options, plus a third new one - the option to reduce takeoff distance by 1900 feet. This allows the airplane to climb at a standard rate and still clear the nearby obstacle with an acceptable safety margin. Obviously you would have to carefully plan to make sure your airplane, on that day, given those weather conditions and loading, can be off the ground by then. Seems like a small additional amount of safety factor, and it is, but the reason for the shorter takeoff roll option is just because some obstacle just barely penetrated the clearance surface and this slight reduction resolves it.


This is a good time to note the "cross departure end of the runway at least 35 feet AGL" wording in various training and reference publications. This requirement has been removed from the TERPS - the procedure design standards - but is still referenced in many FAA publications, such as the Aeronautical Information Manual, para 5-2-8b1 and the Instrument Procedures Handbook, page 1-14. Both of these say substantially the same thing:

"...required obstacle clearance for all departures, including diverse, is based on the pilot crossing the departure end of the runway at least 35 feet above the departure end of runway elevation..."

Which, while a good idea from a safety perspective, is not technically accurate any longer. I believe the issue was one of planning - how do you determine whether you can cross the departure end 35 feet high? Many light aircraft performance charts give a 50-foot figure, but how do you extrapolate? So the standards were revised to the easier-to-determine method of just getting airborne by the end of the runway, unless otherwise specified.

Okay, so you took off, but now what?

In the MLC example, he was departing from runway 2, but the first fix in his clearance was the MLC VOR to the south - behind him. How to go about getting there?


In the absence of a departure procedure or specific ATC instructions, the short answer is "however you want" (within reason of course). There are only a couple of restrictions, both spelled out in the same AIM paragraph linked above:

1. You climb on runway heading to 400 AGL before turning.
2. You keep climbing at the standard rate (200 feet per nm) or as specified in the takeoff minimums up to your cleared altitude.

So in this case, the way to go would be to climb straight ahead to a comfortable altitude, then turn direct to the VOR and proceed on your cleared route. Depending on the ceiling and visibility, I might not turn all the way around at 400 feet, though it should be safe to do so - a little more altitude might be prudent in low IMC, plus it allows a little more time to get turned around and tracking direct to the VOR, which is still very close behind you.

This is what's known as a "diverse departure". "Diverse" in this sense meaning "any direction", as there are no restrictions placed on the pilot as far as routing goes. In non-mountainous areas of the country like McAlester, Oklahoma, the safety of a "200 feet per nm" climb gradient is evaluated out to 25 nm from the airport. In mountainous areas, it's 46 nm. This is almost always enough to get you on a published airway, above the OROCA, or into radar contact. And if you're wondering what the definition of "mountainous area" is, the FAA defines that as well in 14 CFR 95.

The map of the continental U.S. leads to some humorous observations, like Scottsbluff, NE being considered mountainous. I suppose they had to draw a line somewhere!


The great thing about takeoff minimums and departure procedures is that you can always (and should always) review them, on the ground, before even getting in the airplane. Once in flight you may have to land at an unplanned airport, but I haven't yet heard of the takeoff happening at a different airport!