Friday, March 27, 2015

"What's it doing now?", or GPS turn anticipation-gone-wild...

I was on a recent flight with an instrument student in a very well-equipped Bonanza that provided a very instructive example of a few things:

1. Know your avionics equipment.
2. Know your autopilot.
3. When flying instruments, slowing down is your friend!

We were headed from Wichita, KS (ICT) to the Stillwater, OK VOR (SWO) in more or less a direct routing as part of the required “long IFR cross country”. The intent was to fly the KSWO VOR RWY 17 with the procedure turn and everything for training purposes. Kansas City Center provided us with “direct SWO VOR” and “maintain 4000 until established”.

Our approximate course:


The procedure for reference:


Now, this is in an area where Center’s radar coverage does not go all the way to the ground – that’s why the clearance was only down to 4000. You may also notice that there is a feeder route from the PER VOR to SWO VOR published at 3000. Though we were close, we weren’t actually on the PER-SWO route, so we had to maintain 4000 as assigned. In addition, I wanted us to start at 4000 - it would set up a great scenario for the “slowing down and going down” dilemma faced by faster, slipperier airplanes – you can descend OR slow down, but it’s hard to do both at the same time. Being at 4000 once we started the outbound procedure turn, then down to 2600, then down to 2100 once inbound could mean a lot of juggling and planning of power settings and configuration changes (as we all know, CFI's love to inflict this kind of torture…).

We descended to 4000, but hadn’t slowed down yet – we still had a ways to go, after all. Eventually the GTN 750 showed about 10 miles to go to the VOR, and we were doing around 155 kts GS (and airspeed too, it was pretty calm). The GTN's CDI output was in “GPS” mode – appropriate for this phase of the flight, and the autopilot was in GPSS mode, following the GPS course exactly.

Note - the following screen captures are from Garmin's GTN 750 simulator - so they're not from the real flight. However, they're representative of what was going on and pretty accurately depict what was happening.


At about 10 miles out, the pilot told me he’s going to start slowing down. Okay. Shortly thereafter, the GTN then shows us the following course:


Holy turn anticipation, Batman! The GTN plotted a course that would turn before the VOR (as expected) to intercept the procedure turn outbound course. However, due to our ground speed and the angle of turn, it had to lead the turn by several miles. (If you're interested, the turn radius of a standard-rate turn at 155 KTAS is about 5000 feet, so twice that to make essentially a 180-degree turn). This several-mile lead turn would make us roll out on the procedure turn outbound PAST where the GPS had also calculated we should have finished the procedure turn and been back inbound (dashed white line). Notice the "miles to go" in the bottom right corner (7.4nm) is still showing the distance to the VOR. How far until the turn starts is not depicted.

At this point the pilot realized he'd sure better get slowed down. The Bonanza is pretty slippery, of course, and we were only able to drop a few knots by the time the turn started. We elected to leave the autopilot on to "see what it's going to do" now - something I wouldn't have recommended in actual IMC, but a possibly informative moment in training.


The GPS started around the turn as expected, and rolled out on the PT outbound course. The GPS auto-sequenced to now highlight the PT course. Notice that we have not yet started the PT yet, and are at the end of it - we should be pointed the opposite way. Also, our TAS (GS) is still pretty high (105-110 is normal in the Bonanza) because of the previously-discussed need to descend and slow down simultaneously:


Now I was really intrigued - how is the GPS going to get out of this? Keeping in mind that GPS-steering essentially tries to correct left/right deviations from course - and at this point we are well left of the intended course, which is over a mile southeast of us at this time. So it should correct to the right, right?

And it did!


At this point the programming of the GPS apparently decided we must have already completed the procedure turn and therefore should be inbound, as it did two things - one, it highlighted the inbound course as our current leg, and two, it kept us turning around to the right to intercept, the "opposite" way that a PT is normally flown:


Finally, having intercepted the final approach course, the GPS and autopilot did line us up nicely on final:


Back on course, the pilot switched from GPS to VLOC mode and the mean instructor made him turn the autopilot off and hand-fly the rest.

I love educational moments like this! There were several lessons to be learned:

- SLOW DOWN! There's never such a thing as slowing down to approach speed and configuration too early, especially when you have a big turn coming up. Had we been down at 105-110 KTAS before the first turn started, the turn radius would have been much smaller and the outbound course would have been intercepted in plenty of time to perform a "normal" PT.

- PLAN AHEAD! An approach briefing is more than just reading the altitudes and heading off the chart. Know where you are on the chart. How are you going to get into the approach? What altitude? What are you going to have to do to make that altitude? When to slow down? How much turn? Lead it or don't lead it?

- Don't give up CONTROL to the machines! If you don't know what "it" is doing, whether "it" is the GPS or the autopilot, take over and fly it by hand. I had no idea how this was going to turn out, and I wouldn't have wanted to find out in actual IMC.

- As much as you can, KNOW your equipment and how it functions. Sadly, I looked in the GTN750 pilot's guide and couldn't find much about how it calculates turn anticipation, or at what point it starts showing it (note that the first picture above doesn't even show the turn yet).

Lots to learn in this flight, but that's one of the main purposes of the "long IFR XC" in training. I'd say mission accomplished!

Wednesday, February 11, 2015

Flying "teardrop" procedure turns

An interesting situation was brought to my attention a few days ago by a reader (and former instrument student). He (for reasons known only to him) decided to fly the RMN ILS OR LOC RWY 33, in the simulator, using only one VOR and an ADF. Yes, your guess as to why is as good as mine. However, he (correctly) identified that the turn radius depicted by the initial segment starting at HIGAP and arcing to (AFUWY) is way larger than needed in the airplane he was flying (a typical four-place single).


Let’s talk about this type of procedure turn a bit, since you don’t see them very often. Actually, many pilots studying for the instrument written for the last 10 or 20 years have probably seen one at least once, as the Duncan, OK (DUC) LOC RWY 35 used to be an example procedure on the test, and used to have this type of procedure turn. However, it has since been modified and has a (regular) procedure turn. And may not be on the test any longer, though I’ll have to defer to those of you studying for it to let me know about that.

Regardless, it had the same geographic setup as RMN – a VOR a few miles away on final, but offset to one side a couple of miles. How to use it to get turned around and lined up on final? This is a situation where the teardrop procedure turn can be used by the procedure developer. Essentially, from the BRV VORTAC you fly the 122 radial outbound until 10 DME (or intersection with the 279 bearing to EZF), then begin a right turn around to intercept the final approach course on the localizer.

Of course, that turn radius depicted has to cover all speeds of airplanes, right? Accordingly, it is WAY larger than you would need for a light single-engine airplane. If you measure the distance between HIGAP and (AFUWY), it’s about 5.7 nm, meaning a turn radius of half that. But what is the turn radius of, say, a Cessna 172 at 90kts in a standard rate turn?

(Note – way geeky content ahead. CLICK HERE to just skip ahead to the answer and keep reading from there.)

You can easily figure this out if you pull out your copy of “Aerodynamics for Naval Aviators”. What, you say you don’t have one? Of course you do, this is 2015 after all:

https://www.faa.gov/regulations_policies/handbooks_manuals/aviation/

This book really has a lot of good stuff in it, which is why it’s still used as a reference, unchanged, since 1965. A quick (?) browse will take you to page 178, which has formulas for turn radius and turn rate. As we are in a standard rate turn, we know our Rate Of Turn (ROT) is 3 degrees per second. What we need to determine is our bank angle from the second equation, then use that in the turn radius formula.


In the second question, solving for phi:


Using V = 90 KTAS and ROT = 3 degrees per second, phi (angle of bank) = 13.9 degrees.

Inserting phi = 13.9 into the first equation gives us a turn radius of……….

2907 ft.

Alternately, you can use Figure 2.29 on the next page if you prefer a chart format. Notice there are two sets of “bank angle”  curves, you use one to solve for radius and the other for rate. Since we know rate, we can work backwards from there. Personally, I prefer the formula method, but that’s me.


Okay, so if you skipped right to here, the radius of a standard rate turn at 90 KTAS is about 2900 feet, or about 1 nm in diameter.

So back to the RMN ILS teardrop – if we entered a standard rate turn at HIGAP, we would be well right of the final approach course after completing the turn. So how to combat that – fly a half-standard-rate turn? Quarter standard rate? No, no need to try to stay on the line – it’s not a DME arc. Instead, begin your turn at HIGAP but then roll out to establish a normal intercept angle to the final approach course. Don’t worry, that whole area between the outbound and inbound legs has been evaluated for obstacles, and as long as you stay at or above 3000 feet until on final, you’ll be safe.


Remember the effect that wind might have on your ground track – a north or northeast wind will tend to push you toward final quicker than normal, and a wind from the west will have the opposite effect, “holding you back” from intercepting the final approach course. The segment between HIGAP and intercepting final is essentially a dead-reckoning course.

Alternately, another solution could be to fly a 10 DME arc from the VORTAC - but obviously this would only work if the facility had DME and the value was published. 

I know what you’re wondering, because I was too. What true airspeed would allow an aircraft to maintain that arc in a standard-rate turn (no wind)? I calculate about 536 KTAS (the method how is left as an exercise for the reader). Not too likely in a Skyhawk, and even more, a “standard-rate”, 3 degrees per second turn at 536 knots requires a bank angle of about 56 degrees. That’s “slightly” past the limit for passenger comfort in commercial air travel, and 536 ktas is “slightly” above the speed limit of 250 KIAS below 10,000 feet anyway (yes, I know, the speed limit is “indicated airspeed” not “true”, but c’mon now).

So what’s the deal with this huge turn radius on the approach?

Above about 180 KTAS, a standard rate turn requires greater than 25 degrees of bank. As a result, faster aircraft use 25 degrees of bank as a maximum, regardless of the “degrees-per-second” that result. (Note I am not a jet pilot, but this comes from AIM 5-3-8j6, which admittedly only references holding patterns. Please correct me if I am wrong.)

At 25 degrees of bank, the speed necessary for that 4.7 nm diameter circle is “only” 273 KTAS. Still pretty quick, but not out of the realm of possibility at the maximum 250 KIAS, depending on atmospheric conditions!

This type of teardrop used to be seen quite often on the military “HI” approach charts, where the idea was to cross the field at a high altitude then have an outbound and inbound leg long enough for the descent – a “high-altitude penetration turn”. But even then, many U.S. military bases do not have them anymore. I’ll have to defer to any military aviators who read this to let me know why.

I have no idea how many of these teardrop procedure turns are around. It doesn’t seem to be very many, and the number is likely getting smaller as the teardrop is replaced with other options. But if you see one, now you know what it’s all about!

Tuesday, January 13, 2015

"Higher in a minute" vs. "Climb via the SID"

This isn't really a TERPS article like most of the rest of mine, but it's an important point that a friend's recent corporate jet flight out of Teterboro, NJ brought up.

Here's what happened:

He was cleared to depart runway 24 using the TETERBORO NINE departure, then to "climb via the SID, expect FL xxx 10 minutes after departure...". The TEB9 departure requires a couple of intermediate level offs before climbing up to your cleared altitude:


After takeoff, having leveled off at 1500 on heading 280, but prior to reaching 4.5 DME, ATC told him in the initial call, "Off of Teterboro, N12345, radar contact. Higher in a minute." In typical NYC-area fashion, the other nonstop radio communications prevented any immediate clarification.

His question was the same as mine and yours - what exactly does the controller mean by "higher"? That's not standard phraseology. Higher than what in a minute? Typically something like this would be used when a delay is expected to the final altitude, FL xxx in this case. But since in this case there are some intermediate altitudes, there are essentially two possibilities:

1. I can't clear you to FL xxx right now, but can soon. Since you were already cleared to climb via the SID, climbing to 2000 is fine but I'll have your "higher" altitude in a minute.
2. I want you down at 1500 feet for now, don't climb up to 2000 yet. I can get you "higher" than you are currently in a minute.

Who really knows what ATC wanted? The pilot chose (wisely) to assume the worst and stay at 1500. Fortunately, immediately upon crossing 4.5 DME he received a climb to 11,000, so the issue resolved itself without any further difficulties.

The FAA has recently (April 2014) been implementing new "Climb via the SID" terminology, which in large part is designed to reduce this kind of ambiguous situation. However, it actually caused the confusion this time.

NBAA has a great write-up and slideshow briefing on "Climb via" (and its sibling "Descend via" for STARs) at the following link. It's worth a read if you fly anywhere that you're commonly issued SIDs and STARs.

http://www.nbaa.org/ops/cns/pbn/climb-via/

Notice that subsequent altitude assignments effectively cancel the "climb via" authorization. A case could be made that in this example, that's exactly what happened.

But I think the most important thing to take out of this scenario is what we all learn in Private Pilot training - if you don't understand what ATC wants you to do, don't assume, ask! If the frequency is so busy that you can't get in a word, then use good judgment and take what action is necessary. In this case, the PIC and SIC both decided they would stay at 1500 - in my opinion, the absolute right move.

A long time ago (yes, in a galaxy far, far away too), someone told me that whenever you're trying to decide to doing something that you're not sure about, think how you would sound trying to explain your decision to a jury (or the NTSB for example). "Well, the controller told me 'higher in a minute', so I went ahead and climbed from 1500 to 2000 because I thought he meant I could go higher NOW, but even HIGHER in a minute." Doesn't sound very convincing, does it?

It may very well have been what the controller wanted, but we don't know. Good communication is the key!

Thursday, November 13, 2014

"Diverse Departure" procedures

I've written about various types of departure procedures before - VCOAs here and the option for Part 91 operators to take off in "0/0" conditions here.

But I recently received some questions from a friend and reader based on a recent flight of his from Denton, Texas to McAlester, Oklahoma (MLC) and returning, which you can read about on his blog at pilottangocharlie.blogspot.com. After stopping at MLC, he got his clearance which consisted of the MLC VOR as the first fix. There were some real instrument conditions around, so this was a for-real instrument departure. But the only departure "procedure" that is published for MLC is a set of takeoff minimums. He realized this situation wasn't covered real well in his instrument training, and needed a little refresher on how this works.

I can sympathize! My instrument training was in southeast coastal Virginia, where the flat terrain makes Obstacle Departure Procedures (ODP's) purely an academic exercise for the most part. Add in that radar coverage was excellent and most IFR releases simply started with "Fly runway heading..." and the result was that ODPs were not covered very well during my IFR training (in fact, they may not have been covered at all). In my experience this is pretty common, which is unfortunate because every flight starts with a departure!

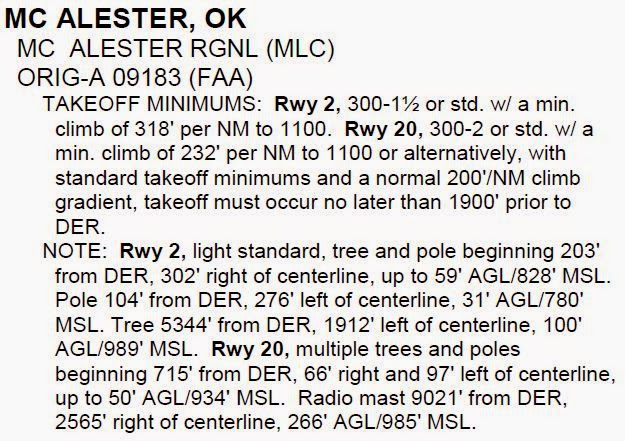
McAlester actually has a good example of a basic textual obstacle departure procedure (or lack thereof):


From Runway 2 it has a pretty typical set of takeoff minimums or a minimum climb gradient. This situation I covered in my "0/0" article, so I won't go into it here. But remember that while these takeoff minimums aren't required for Part 91 operations, they are a REALLY good idea.

From Runway 20 there are the same two options, plus a third new one - the option to reduce takeoff distance by 1900 feet. This allows the airplane to climb at a standard rate and still clear the nearby obstacle with an acceptable safety margin. Obviously you would have to carefully plan to make sure your airplane, on that day, given those weather conditions and loading, can be off the ground by then. Seems like a small additional amount of safety factor, and it is, but the reason for the shorter takeoff roll option is just because some obstacle just barely penetrated the clearance surface and this slight reduction resolves it.


This is a good time to note the "cross departure end of the runway at least 35 feet AGL" wording in various training and reference publications. This requirement has been removed from the TERPS - the procedure design standards - but is still referenced in many FAA publications, such as the Aeronautical Information Manual, para 5-2-8b1 and the Instrument Procedures Handbook, page 1-14. Both of these say substantially the same thing:

"...required obstacle clearance for all departures, including diverse, is based on the pilot crossing the departure end of the runway at least 35 feet above the departure end of runway elevation..."

Which, while a good idea from a safety perspective, is not technically accurate any longer. I believe the issue was one of planning - how do you determine whether you can cross the departure end 35 feet high? Many light aircraft performance charts give a 50-foot figure, but how do you extrapolate? So the standards were revised to the easier-to-determine method of just getting airborne by the end of the runway, unless otherwise specified.

Okay, so you took off, but now what?

In the MLC example, he was departing from runway 2, but the first fix in his clearance was the MLC VOR to the south - behind him. How to go about getting there?


In the absence of a departure procedure or specific ATC instructions, the short answer is "however you want" (within reason of course). There are only a couple of restrictions, both spelled out in the same AIM paragraph linked above:

1. You climb on runway heading to 400 AGL before turning.
2. You keep climbing at the standard rate (200 feet per nm) or as specified in the takeoff minimums up to your cleared altitude.

So in this case, the way to go would be to climb straight ahead to a comfortable altitude, then turn direct to the VOR and proceed on your cleared route. Depending on the ceiling and visibility, I might not turn all the way around at 400 feet, though it should be safe to do so - a little more altitude might be prudent in low IMC, plus it allows a little more time to get turned around and tracking direct to the VOR, which is still very close behind you.

This is what's known as a "diverse departure". "Diverse" in this sense meaning "any direction", as there are no restrictions placed on the pilot as far as routing goes. In non-mountainous areas of the country like McAlester, Oklahoma, the safety of a "200 feet per nm" climb gradient is evaluated out to 25 nm from the airport. In mountainous areas, it's 46 nm. This is almost always enough to get you on a published airway, above the OROCA, or into radar contact. And if you're wondering what the definition of "mountainous area" is, the FAA defines that as well in 14 CFR 95.

The map of the continental U.S. leads to some humorous observations, like Scottsbluff, NE being considered mountainous. I suppose they had to draw a line somewhere!


The great thing about takeoff minimums and departure procedures is that you can always (and should always) review them, on the ground, before even getting in the airplane. Once in flight you may have to land at an unplanned airport, but I haven't yet heard of the takeoff happening at a different airport!


Wednesday, October 29, 2014

TAA's and ILSes (and other acronyms!)

Be ready for a few acronyms!

The FAA has recently begun adding GPS routes into ILS procedures, which in my opinion is a great thing! This combination of GPS and ground-based navigation allows for more flexibility for routing and easier flyability among other benefits. Here's what I'm talking about, see this example at Statesville, NC (KSVH).


If you're not familiar with TAA's (Terminal Arrival Areas), they are on many RNAV (GPS) approaches already but are just now being added to ground-based approaches as well:


TAA's allow you to be cleared for the approach anywhere within the depicted area, usually within 30nm of the fix shown (in this case PEGTE). The minimum altitude you must be at depends on distance and what your course is to that fix. So, in this example, coming from the west the minimum altitude is 4300 until within 6 nm of PEGTE, then 3400. From the east it's simpler, just 3400 all the way to PEGTE. Also notice that any course to the fix from 195 clockwise to 015 is considered a "NoPT" segment, so you can skip the depicted Hold-in-lieu-of-Procedure-Turn (HILPT). From the western half of the TAA you are still required to execute the HILPT in the example.

Another benefit of the TAA is that they do not require a VOR-based route into the procedure. Notice that the IF, PEGTE, is not anywhere on the Low Enroute chart (though there are some crossing radials, it's not on an airway). The TAA gives you the flexibility to be on a published segment of the approach, flying direct to PEGTE from anywhere within 30nm.


Another example is that at Rock Hill, SC (KUZA).


This one has a complete "T" setup of IAFs and the TAA to match. Unlike at KSVH, this allow you to come from essentially any direction and avoid flying the HILPT. If you're coming from the northwest, you'd fly direct to GUCRE, then be on a NoPT segment after reaching GUCRE headed to CONEL. The same idea with TAGCU from the northeast. From the south, you'd fly to CONEL and then proceed straight-in after reaching it.

One caution - if like in many airplanes, you're displaying both your GPS and ILS guidance on the same CDI, make sure to switch the CDI source as you reach the IF.

Another great benefit of a TAA is that ATC can clear you for the approach from a long way away. In order for ATC to clear you for the approach, you are required to either be on radar vectors OR established on a published segment of that approach. Since being within the TAA is considered to be on a published segment of the approach, you might be 28nm from GUCRE and hear a very simple "N123, Cleared ILS Y runway 2 approach"!

Now, many of these TAA-to-ILS approaches probably also have an RNAV (GPS) approach to the same runway with LPV minimums. In that case, if you have a WAAS-equipped GPS receiver, you'd probably just fly the GPS approach. But sometimes the minimums aren't quite the same, or there isn't an LPV approach to that runway for various reasons, so the TAA-to-ILS might be a benefit even with a WAAS receiver. If you AREN'T WAAS equipped, then the TAA-to-ILS is great, because it doesn't take a WAAS receiver to fly it!

For more about TAA's themselves, please see BruceAir's great blog post about them here. Highly recommended reading!

I expect to see more and more of these published as time goes on. Let me know if you see a new one!

(Acronym count: 12. I guess that's not too bad.)

Monday, September 22, 2014

Feeder routes to procedure turns - don't make up your own!

There has been a very active discussion occurring on the Pilots of America web board the last couple of weeks regarding a Hold-in-Lieu-of-Procedure-Turn (hereafter HILPT) published on an approach chart in southern Oklahoma. Sadly, as is the case with many online forums, the discussion has degraded into name-calling, insults and other unproductive and uneducational matters. So I'll try to break it down here.

The approach in question is the Durant, OK (KDUA) VOR/DME RWY 35. 


Notice there is one published way for a non-GPS-equipped aircraft to enter this procedure without receiving radar vectors to final. That aircraft would start at the BYP VORTAC IAF, fly the BYP-321 radial until HANOM, turn right, then proceed inbound to the URH VOR/DME on the URH-184 radial. There is a HILPT published at HANOM, but since the route from BYP is labeled NoPT, you would not fly the HILPT coming from that direction.

Well, then from what direction DO you fly the HILPT?

Seems like an easy answer, that you'd fly the HILPT if you were coming at the approach from the north - you'd fly to the URH VOR/DME, then outbound on the 184 radial to HANOM, execute the HILPT and proceed inbound. Except it's not quite that easy, for one main reason:

There is no published segment from URH to HANOM.

Sure, there's a published route from HANOM to URH, but that's not the same thing. A route from URH to HANOM would be properly identified by a thin line as a feeder route. Note that the indication "R-184" below the HILPT does not indicate a route, it is simply showing what radial the final approach course is on. A route would be indicated by an altitude, a course, and a distance. So what is missing here is a charted, evaluated, and published route from URH to HANOM. Note that courses on instrument approaches are one-way, not two-ways like on most airways, and aren't meant to be flown backwards. This is why each segment of an approach has a directional arrow.

This is especially confusing because the URH VOR/DME is right on an airway - V63 - so it would be a logical place to have a feeder. Would it be possible to fly that route, from URH to HANOM and turn around? Of course - any instrument pilot should be able to do it with no problem. But from the way this procedure is charted, that exact route has not been evaluated for obstacles, even though the route the other way has been (the intermediate and final segments).

Why does this matter? It seems from looking at it that flying from URH to HANOM at an altitude of, say 2500 should work just fine. The reason has mainly to do with the difference in size of the areas evaluated by TERPS for intermediate and final segments versus a feeder route; the area evaluated for a VOR final being much narrower than for a feeder route. (At the VOR, the final is 1nm each side of center, whereas the feeder is 4nm each side of center, not considering what are known as "secondary areas" (see my 3/30/14 blog post for more about secondary areas.)

Let's say you're approaching the VOR in such a way that you need to make a 90 degree turn to go outbound on the uncharted "feeder" route from URH to HANOM. An actual feeder route, being wider, allows for you crossing the VOR, then beginning your turn, with enough area to contain the turn radius. A final segment used in reverse would not have this, as the area is much smaller (and turns to line up on final are much more restricted in terms of heading change for this reason). Might not be a problem in a 172, but in something faster it could. What if there is an antenna tower or mountain off to the side of final?

Sometimes a picture is worth more than 1000 words. This is probably such a situation:


This diagram shows a notional view of the areas evaluated for this approach. Since the area from HANOM to URH has been evaluated as a final approach segment, it's pretty narrow. But if an aircraft inbound from the east crossed the VOR and made a turn to proceed outbound on the final approach course, it could easily exceed the boundaries of the evaluated area. At 150 knots, a standard-rate turn results in a turn radius of about 0.8 nm. The final approach area is only 1.0 nm wide at the VOR, so while it seems to fit, that's only in an ideal situation. Adding in a tailwind that will increase turn radius, a slightly delayed start of the turn, and imperfect pilot technique means you rapidly run out of safety margin. What's outside of that area? Could be an antenna tower, could be a mountain, or it could be level terrain as far as the eye can see. There's no telling, but the published altitude doesn't reflect that because it wasn't part of the evaluation.

Compare that to the case if a feeder route was published from URH to HANOM. The feeder route, being much wider for exactly this reason, easily accommodates the turn radius:


So, if we can't fly from URH to HANOM for the HILPT, and if the only published route from BYP to HANOM is a NoPT segment, what's the purpose of the HILPT in the first place? There is none. I speculate that the HILPT is charted correctly, but that a feeder was erroneously left off during publication. This has been brought to the FAA's attention, so it will be interesting to see their response.

An example of a similar procedure that has the feeder and the Procedure Turn (though not a HILPT) charted is the Springfield, OH VOR RWY 24. Notice the thin line from the SGH VOR labeled "300 to OHMEE, 055 deg, (6.4)". It has all the necessary data to serve as a feeder route and has been evaluated and charted. Thanks to a blog reader (and former student) for providing this example!


Instrument approach procedures exist to keep us all safe, but we can't "roll our own". If something doesn't seem right or there appears to be an error, we need to bring it up to the attention of the FAA - don't just assume!

Saturday, September 6, 2014

IFR departures - Visual Climb Over Airport?

"For Climb in Visual Conditions...." wait, aren't I IFR?

Ever see these words on an instrument departure procedure and wondered what they mean? There's a little-taught (and probably even lesser flown) type of instrument departure procedure called a VCOA - Visual Climb Over Airport. I know it wasn't covered at all in my instrument training - of course that was in coastal Virginia, so with the terrain being very flat there wasn't much in the way of actual departure procedures to fly anyway.

So what is this? It's an instrument departure, but involves a VISUAL climb to an altitude at which you can then proceed into IMC along your cleared route. Kind of the opposite of a visual approach in that regard, and typically would only be used in an area without radar coverage. When this is an option, you will see it in either the takeoff minimums/textual departure procedure listing at the front of the approach chart book, or in the takeoff minimums section of a graphic obstacle DP, and it looks something like this:


These VCOA procedures are only published when there is an obstacle greater than 3 sm from the airport that causes a required climb gradient of greater than 200 ft per nm to clear. Here's what the FAA's Instrument Procedure Handbook has to say about them (page 1-38):

Visual Climb Over Airport (VCOA)
A visual climb over airport (VCOA) is a departure option for an IFR aircraft, operating in VMC equal to or greater than the specified visibility and ceiling, to visually conduct climbing turns over the airport to the published "climb-to" altitude from which to proceed with the instrument portion of the departure. A VCOA is a departure option developed when obstacles farther than 3 SM from the airport require a CG of more than 200 FPNM.

These procedures are published in the Take-Off Minimums and (Obstacle) Departure Procedures section of the TPP. [Figure 1-36] Prior to departure, pilots are required to notify ATC when executing the VCOA.

Okay, so there's a specified ceiling and visibility requirement for this VCOA. The intent is for the pilot to take off, spiral up over the airport until reaching a certain altitude, and then it's safe to fly the cleared route even if entering IMC at that point, assuming the climb continues to an appropriate altitude in the clearance. In our example from California, you would make gradual, climbing turns up to 8300 MSL (3400 AGL) and then continue climbing on your cleared route.

At first glance, that almost seems a little silly, doesn't it? The required ceiling is 3500 AGL, and that's pretty solid VFR, so why not just depart VFR? However, the threat that the procedure is designed to avoid is really those times when the ceiling is high enough over the airport, but obstacles (like mountaintops) are still obscured by cloud. This is reflected in the design methods for these procedures.

Briefly, a "cylinder" of airspace is evaluated around the airport, with a radius determined by the elevation (higher elevations needing a greater turn radius due to increasing TAS). In our example, the radius used is 3.4 nm (source - FAAO 8260.3B, Vol 4, Chapter 4).


The highest obstacle in this cylinder is used to establish the "climb-to" altitude. If there are other obstacles outside the cylinder, a 40:1 slope is then evaluated to see if it clears the obstacles. If it does not, then the "climb-to" altitude is increased appropriately. Notice that the "climb-to" altitude also provides for a minimum of 250 feet of obstacle clearance, growing as you get further from the cylinder.


A VCOA can also have a "route" attached to it, like at Craig, Colorado (CAG), where you would climb up over the airport then proceed on a radial to the nearby VOR. This departure procedure also incorporates a "normal" departure if you can make the climb gradient (of 510 ft per nm off runway 7!) but the parts we're interested contain the words "for climb in visual conditions".


This is a pretty complicated textual departure procedure, so it definitely takes some review before takeoff! Note that once you get to the VOR, you're not done - you need to follow the "thence ..." instructions in the last paragraph, which can consist of a climb in a holding pattern depending on your route of flight.

Certainly if you need to execute a maneuver like this it's important to inform ATC when you get your clearance so everybody knows what you're doing and there are no surprises. But flying them is admittedly pretty rare, so let me know how it went if you have actually flown one!